
最新的VMware Certified Advanced Professional 6 - Network Virtualization Deployment - 3V0-643免費考試真題
Build a multi-tier network capable of supporting application virtual machines deployed across multiple vCenter instances.
Requirements:
vCenter: vcsa-01a.corp.local
Credentials: [email protected] / VMware1!
Resource Pools: Management and Edge Cluster 1A
The underlying physical network does not support multicast.
All new items created must have a prefix of "U" followed by their function name and a suffix of "New".
i.e. U-App-Tier-NEW.
Create a LS for HA management interface calle U-HA-VXLAN=NEW but do not enable HA on any of the edge devices deployed.
Deploy logical switches using separate subnets for the three tier application shared by both NSX Manager instances.
Deploy the required east-west routing component used across multiple vCenter instances for the multi-tier network.
Utilize a default gateway up to the Perimeter-Gateway02 (tenant router) from the east/west router.
Utilize a static route from the tenant router to reach the three tiers of the application.
Subnets for the tiers:
172.7.10.0/24 for the Web Tier.
172.17.20.1/24 for the App Tier.
172.17.30.0/24 for the Database Teir.
Use the first available IP address for the router on each of the tiers.
Subnet for the Transit VXLAN uplink from the application tier routing to the tenant router.
192.168.190.0/29
Uplink IP address of the application tier should be the first available IP address.
Downlink from the tenant router will use the second available IP addresses.
The password for new edge device(s) must be VMware1!VMware1!
Add all virtual machines with a prefix "universal-" to their respective segments.
Ensure all LIFs are reachable from ControlCenter.
HOL LAB for Practice:
See the explanation part for complete solution.
Requirements:
vCenter: vcsa-01a.corp.local
Credentials: [email protected] / VMware1!
Resource Pools: Management and Edge Cluster 1A
The underlying physical network does not support multicast.
All new items created must have a prefix of "U" followed by their function name and a suffix of "New".
i.e. U-App-Tier-NEW.
Create a LS for HA management interface calle U-HA-VXLAN=NEW but do not enable HA on any of the edge devices deployed.
Deploy logical switches using separate subnets for the three tier application shared by both NSX Manager instances.
Deploy the required east-west routing component used across multiple vCenter instances for the multi-tier network.
Utilize a default gateway up to the Perimeter-Gateway02 (tenant router) from the east/west router.
Utilize a static route from the tenant router to reach the three tiers of the application.
Subnets for the tiers:
172.7.10.0/24 for the Web Tier.
172.17.20.1/24 for the App Tier.
172.17.30.0/24 for the Database Teir.
Use the first available IP address for the router on each of the tiers.
Subnet for the Transit VXLAN uplink from the application tier routing to the tenant router.
192.168.190.0/29
Uplink IP address of the application tier should be the first available IP address.
Downlink from the tenant router will use the second available IP addresses.
The password for new edge device(s) must be VMware1!VMware1!
Add all virtual machines with a prefix "universal-" to their respective segments.
Ensure all LIFs are reachable from ControlCenter.
HOL LAB for Practice:
See the explanation part for complete solution.
正確答案:
SOLUTION:
universal transport zone
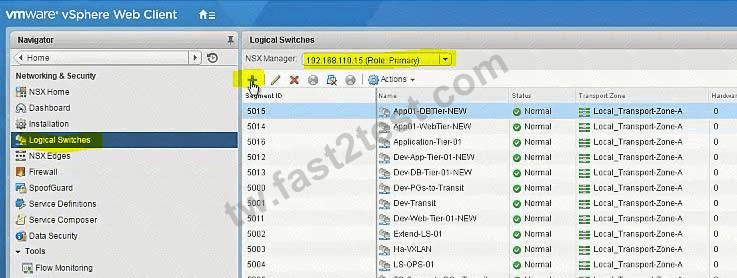
logical switches
U-HA-VXLAN-NEW
U-Transit-NEW
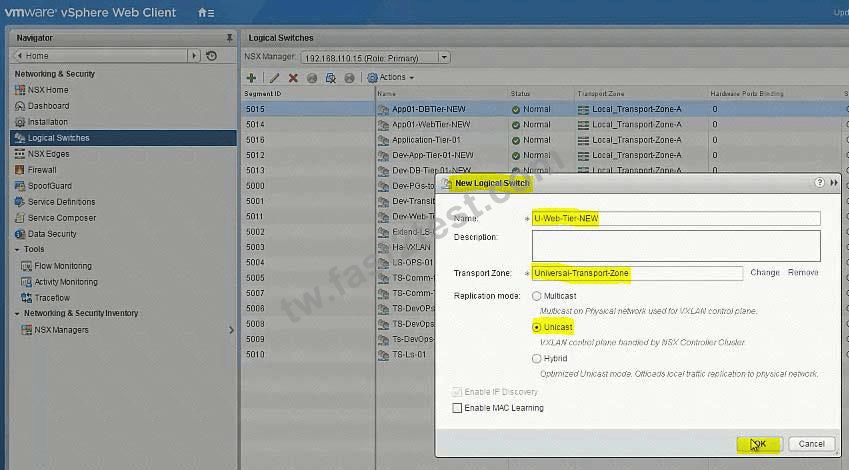
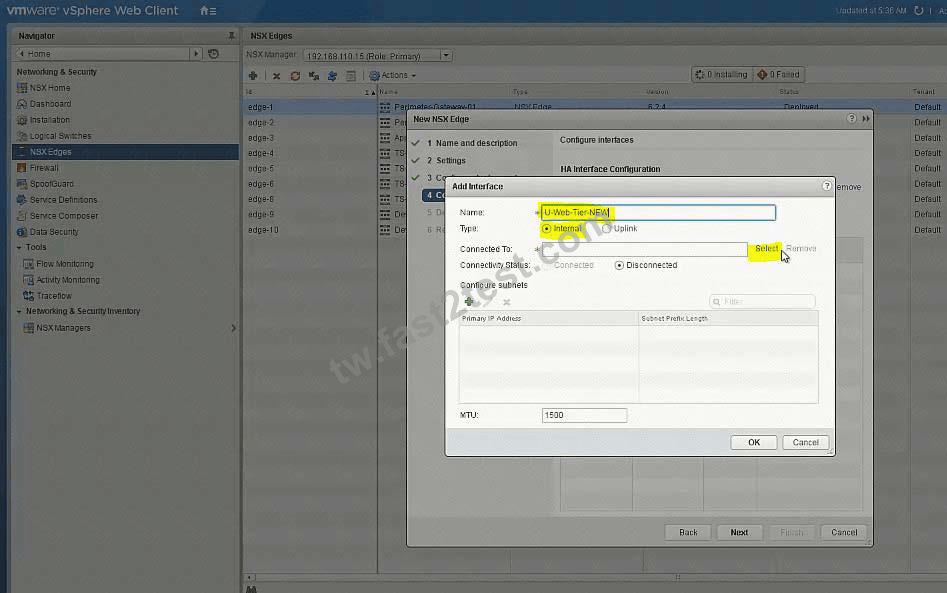
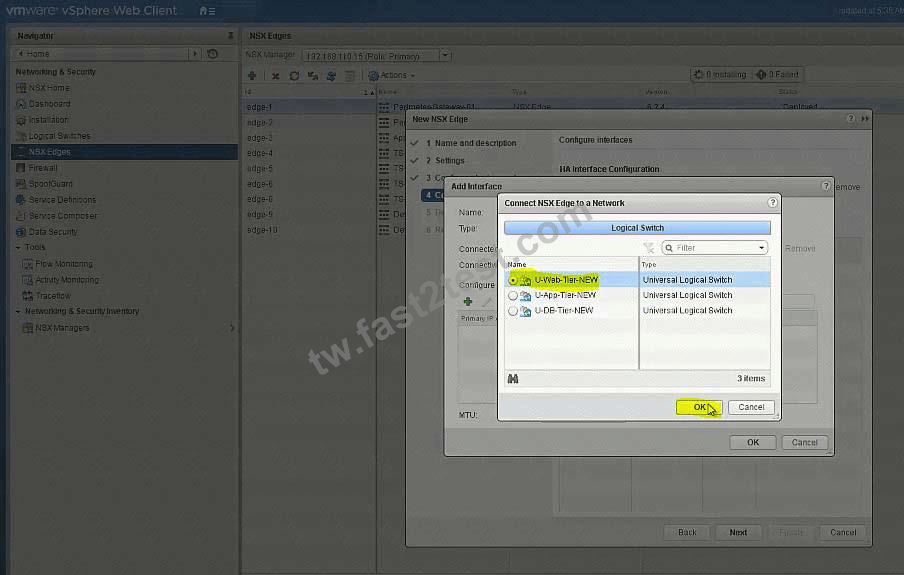
U-Web-Tier-NEW
U-App-Tier-New
U-DB-Tier-New
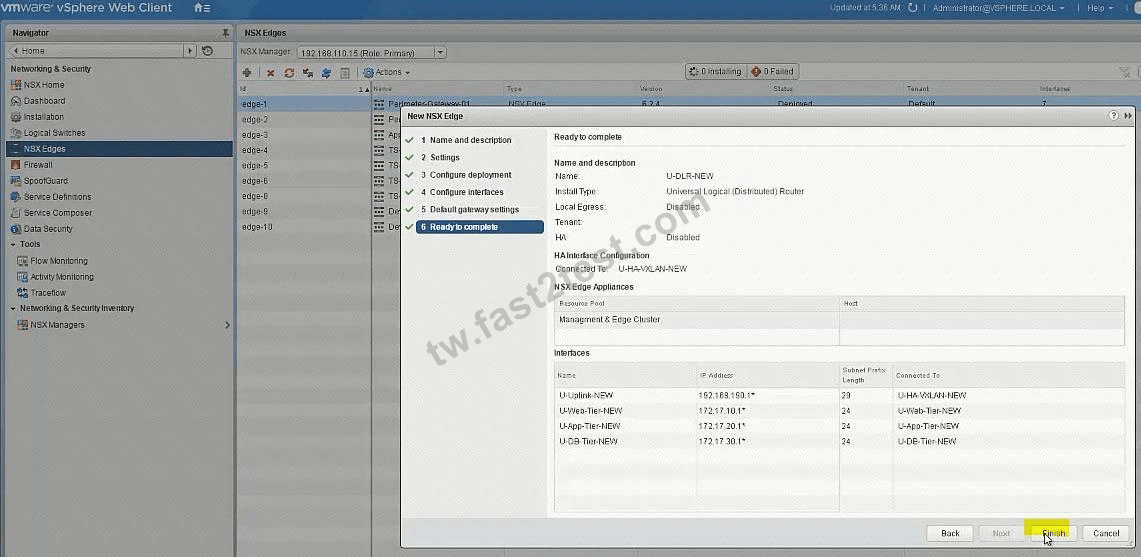
New DLR U-DLR-NEW
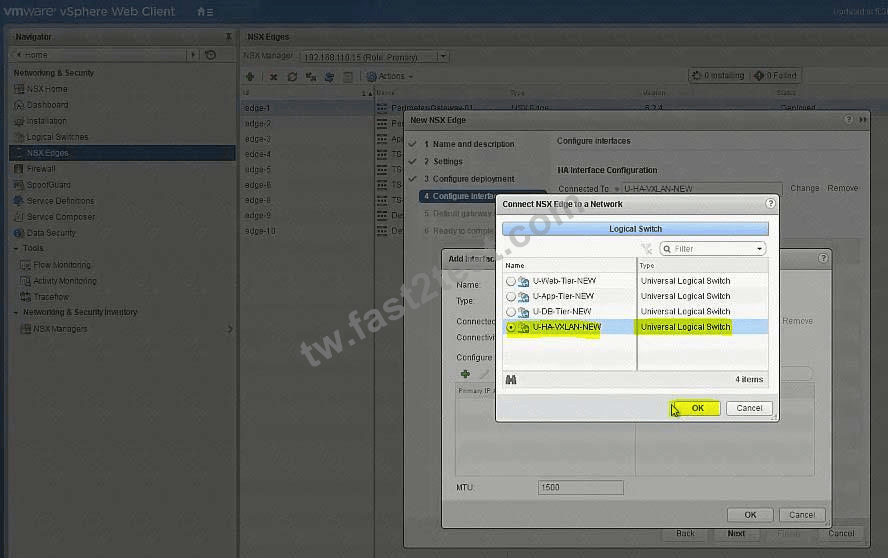
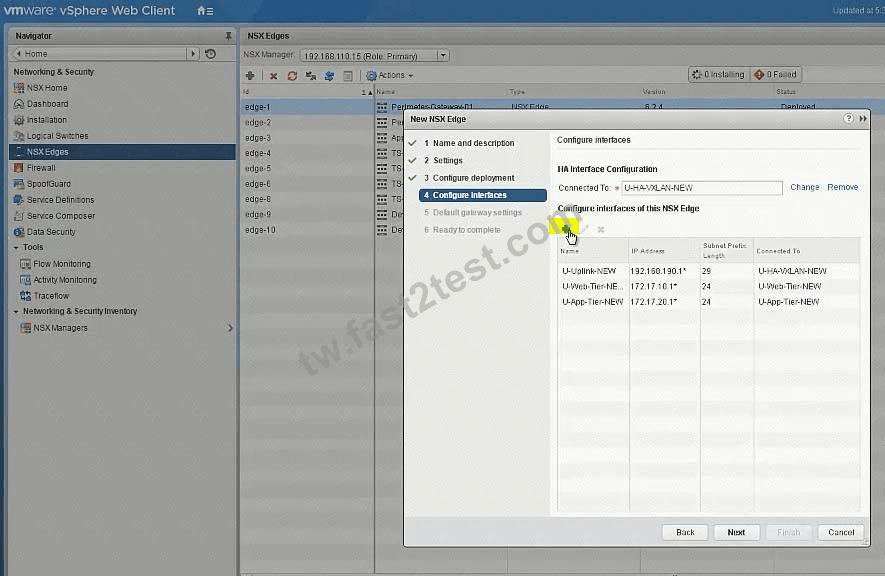
HA Interface - U-HA-VXLAN-NEW
Interface below
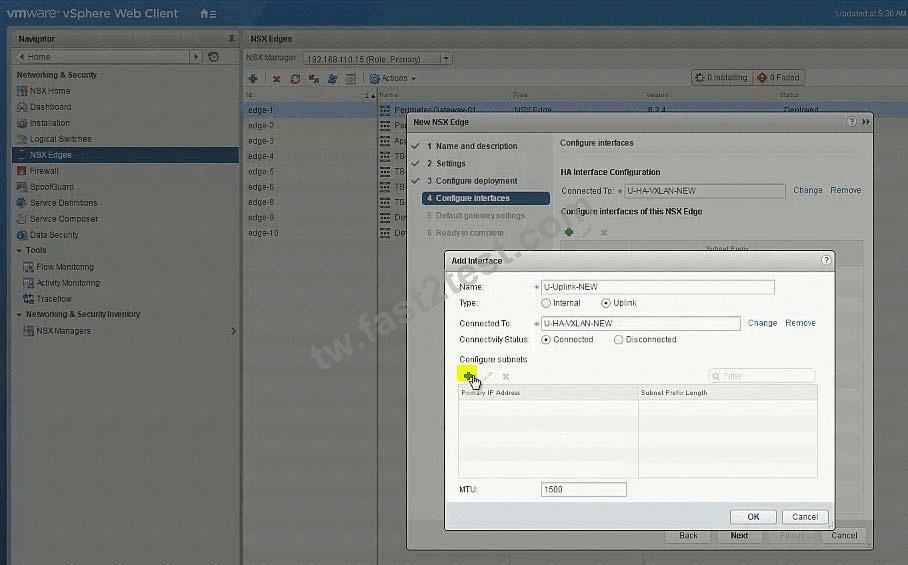
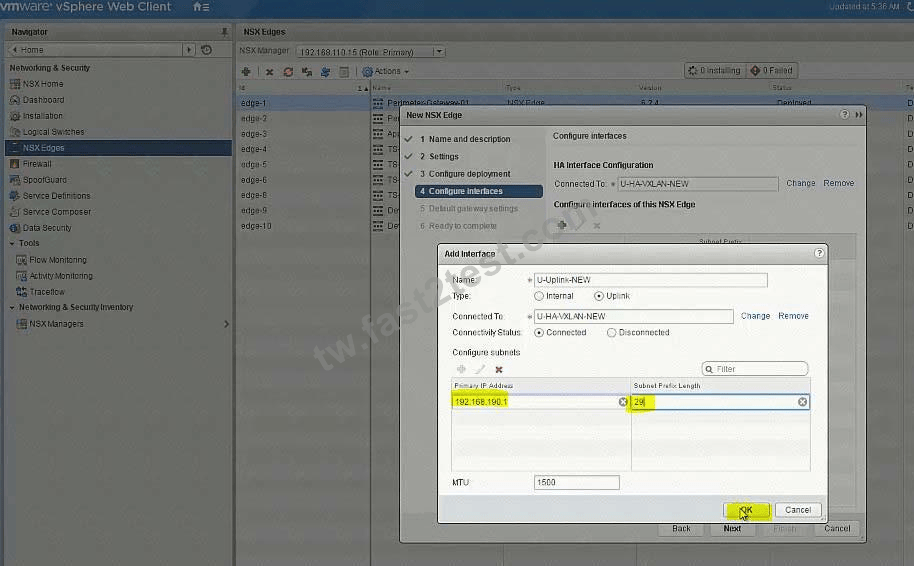
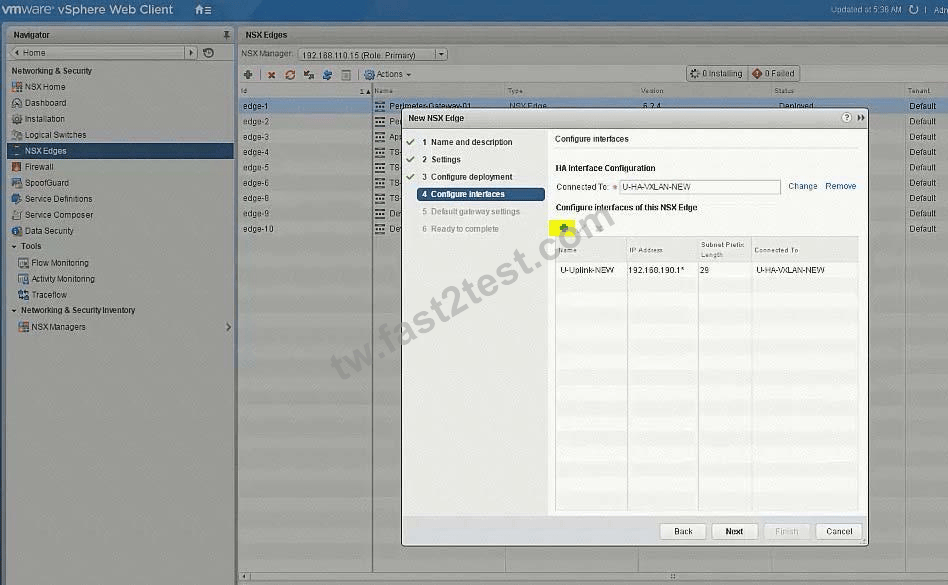
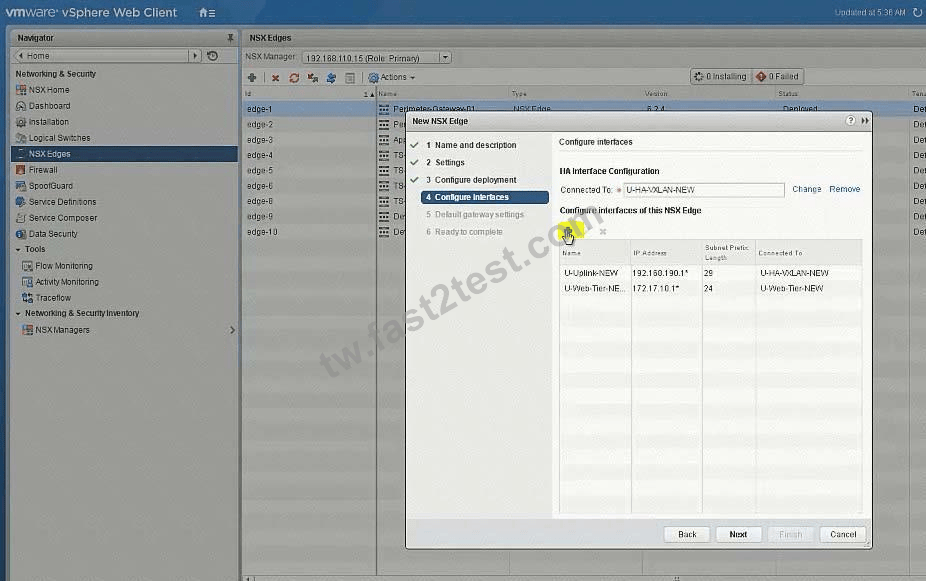
- U-Transit-NEW uplink 192.168.190.1
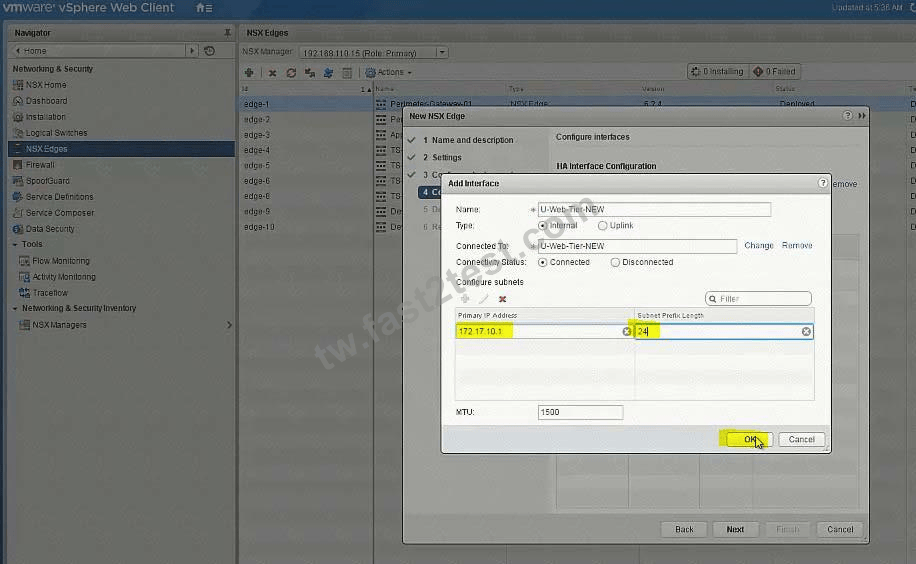
- U-Web-Tier-NEW internal 172.17.10.1
- U-App-Tier-NEW internal 172.17.20.1
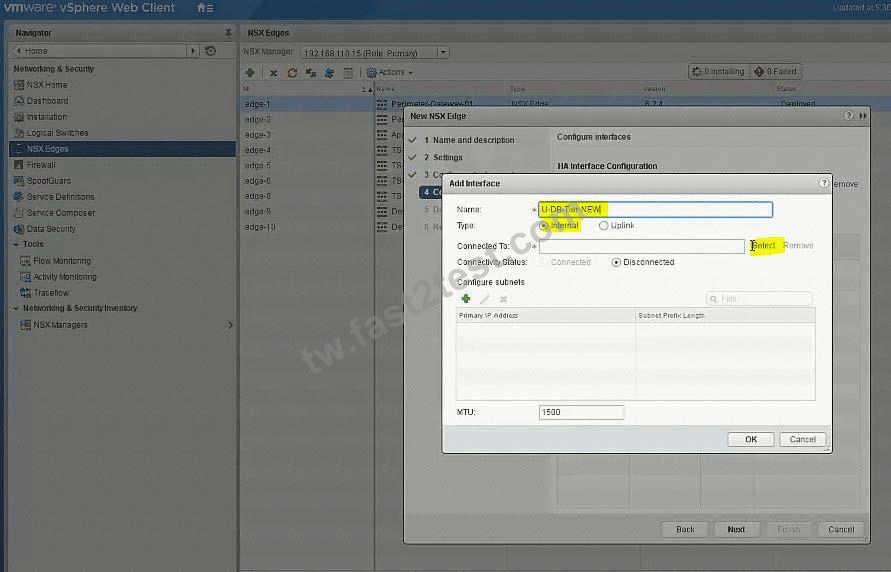
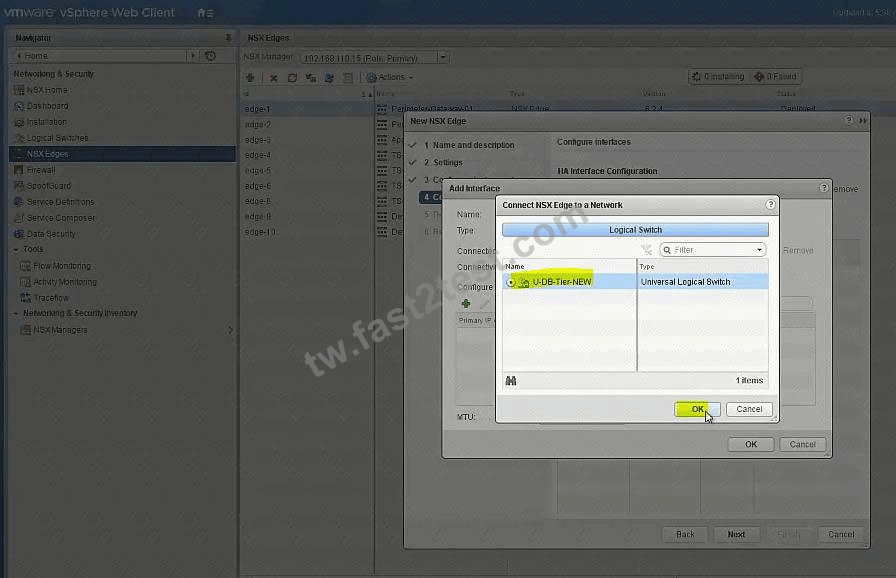
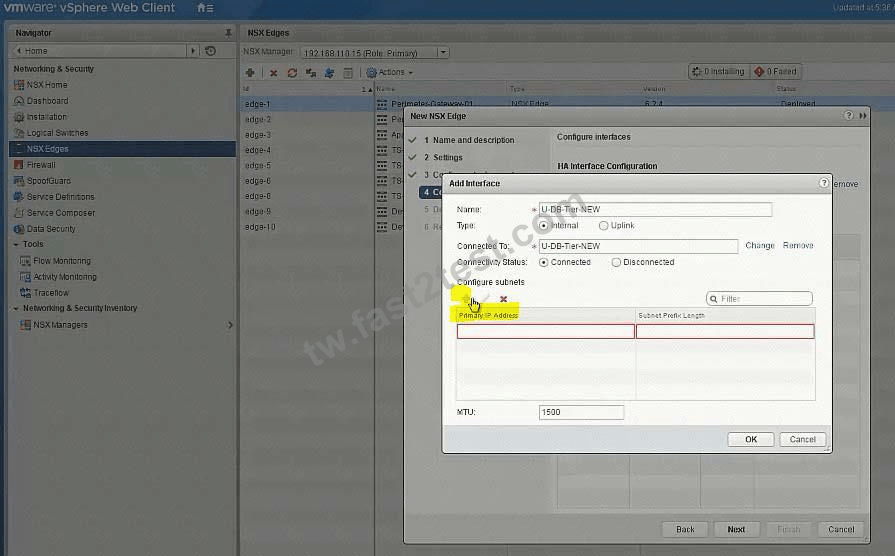
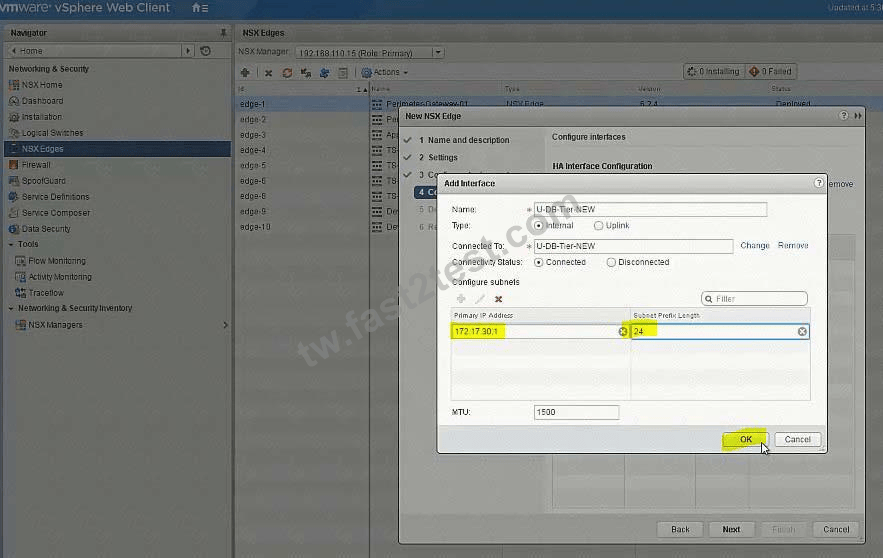
- U-Db-Tier-NEW internal 172.17.30.1
Gateway
-U-Transit-NEW
Ip 192.168.190.2
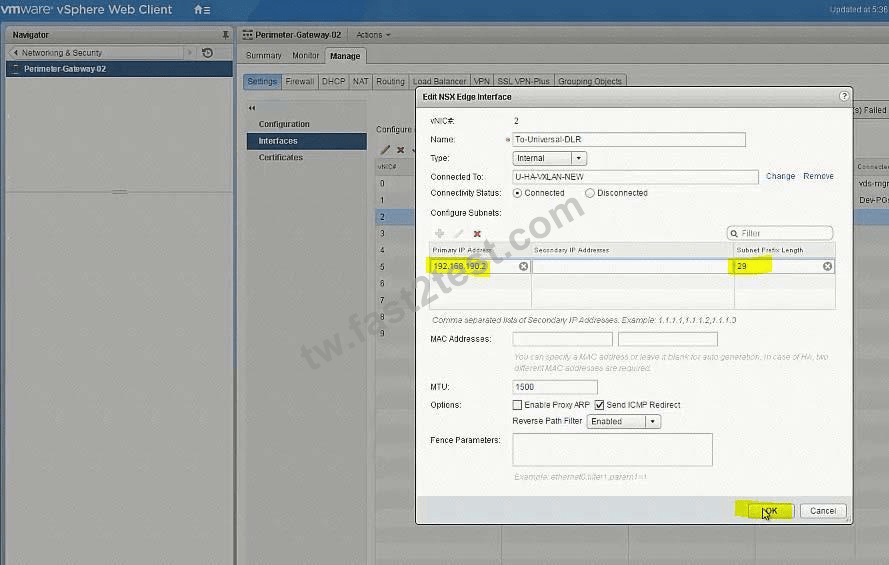
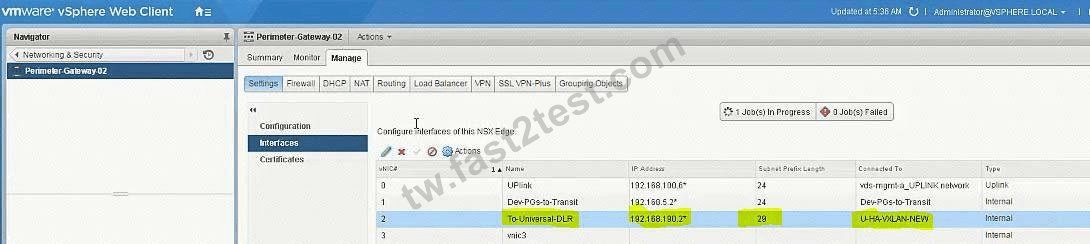
PGW02 vnic4 U-Transit-NEW 192.168.190.2
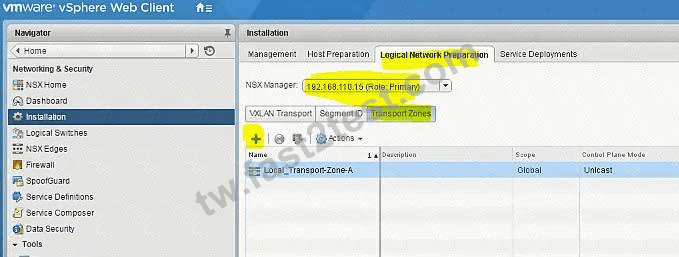
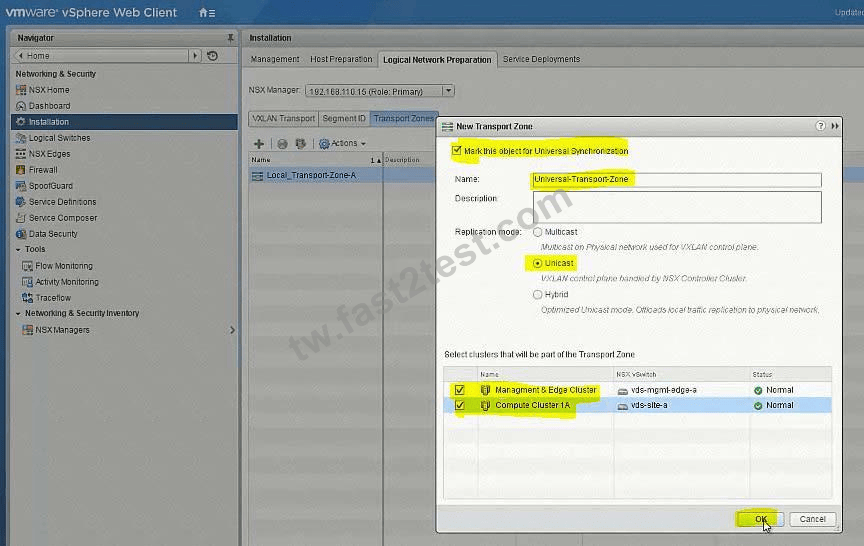


Create 5 logical switches
U-Transit-NEW
U-Web-Tier-NEW
U-App-Tier-NEW
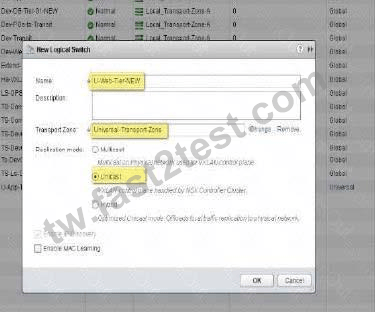
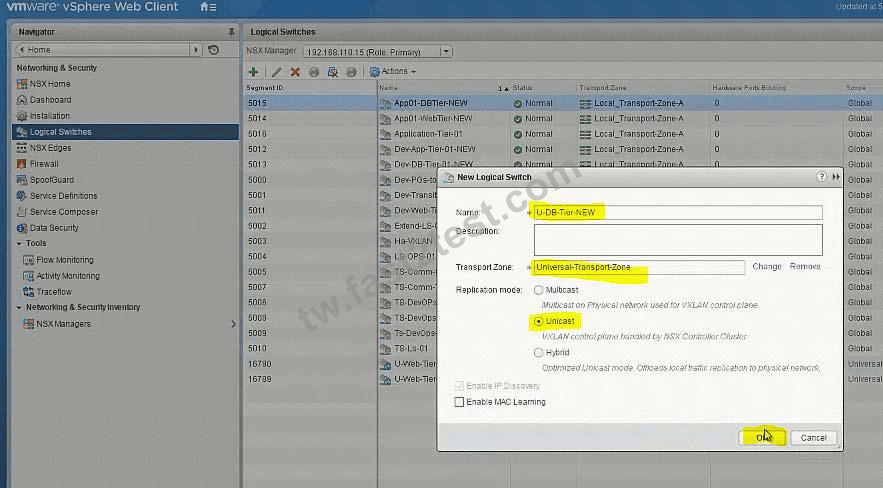
U-DB-Tier-NEW
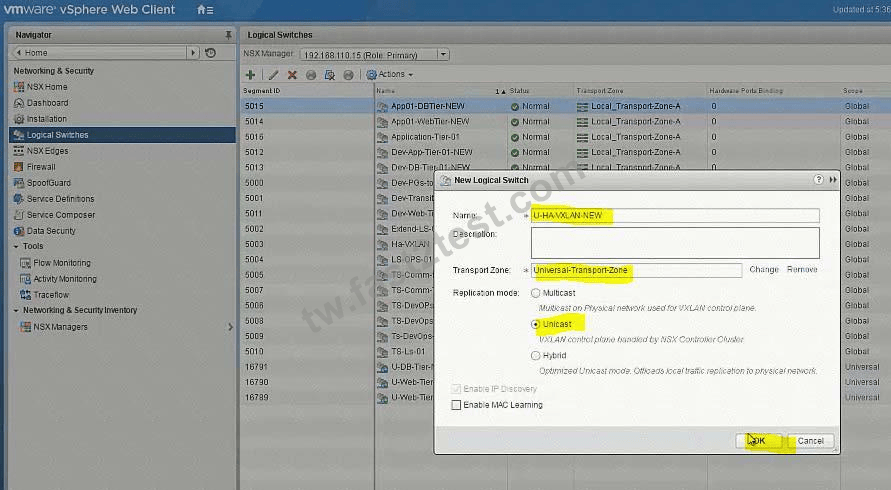
Add VMs to relevant newly created Logical Switches.
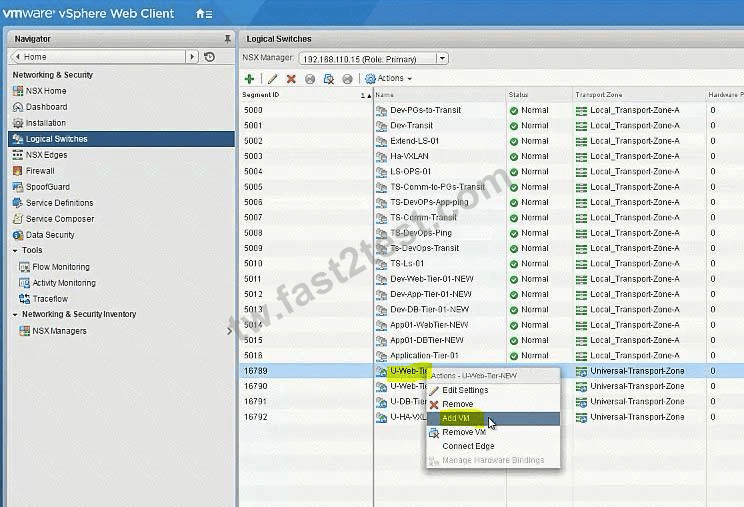
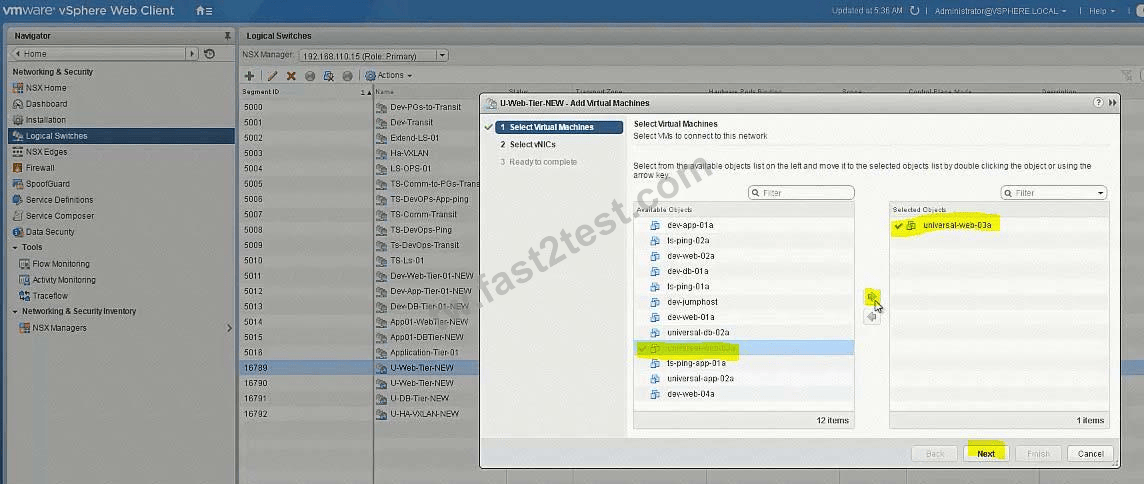
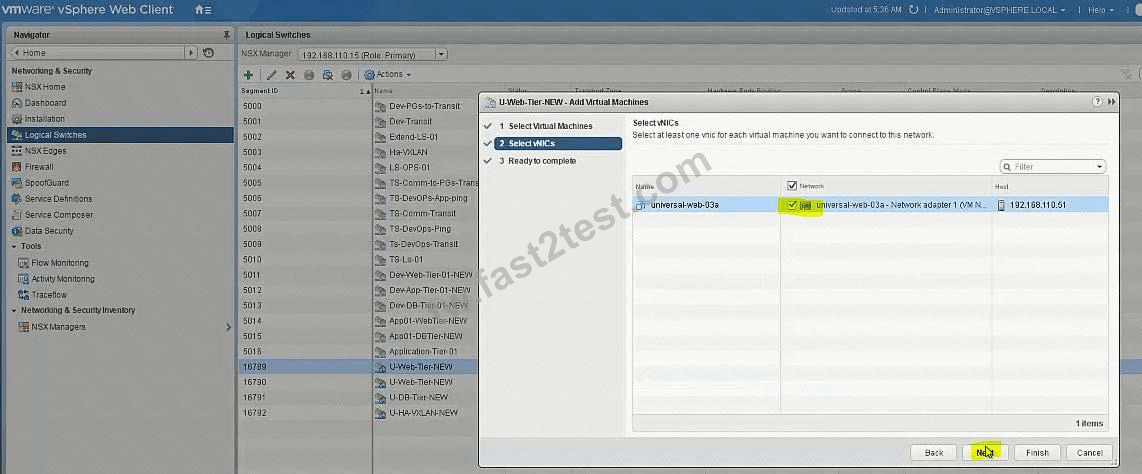

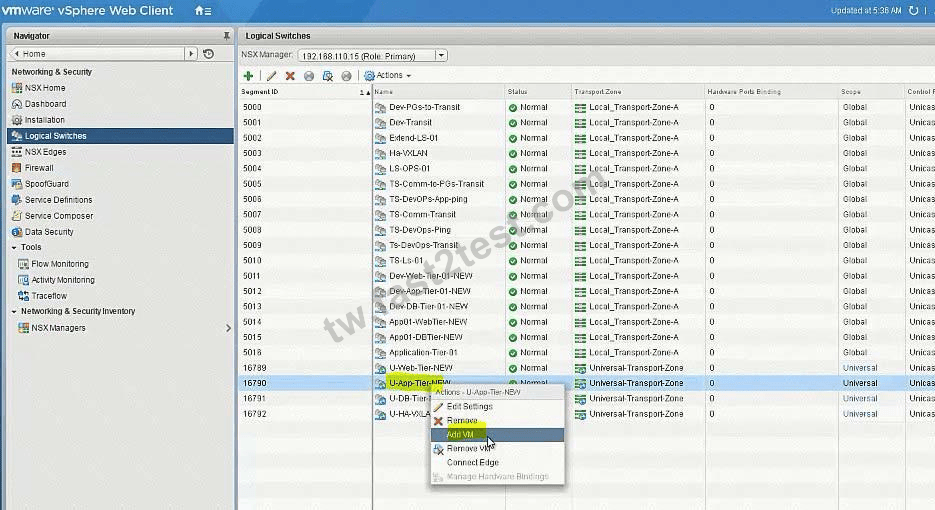

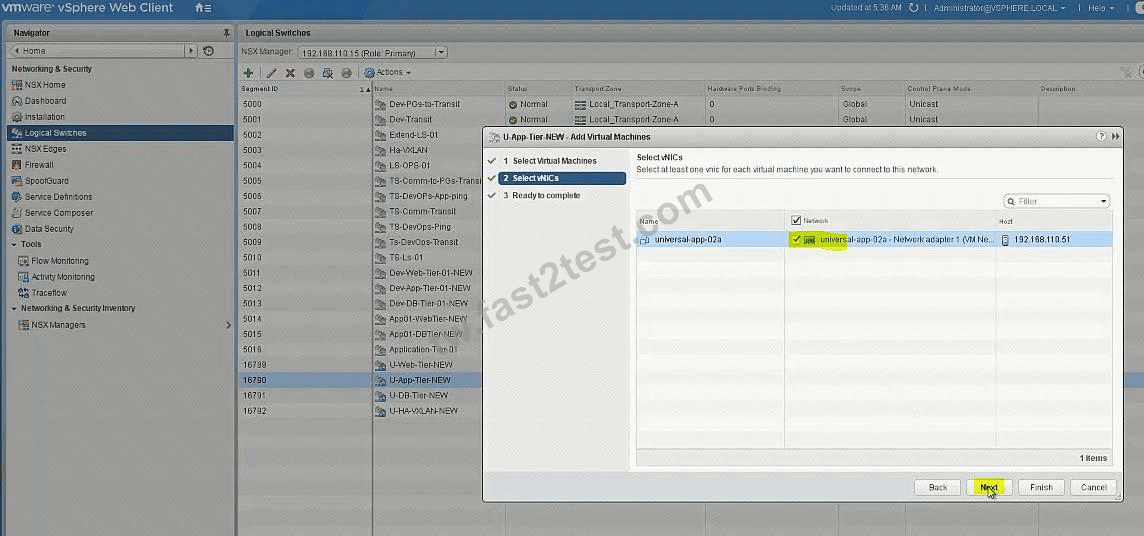
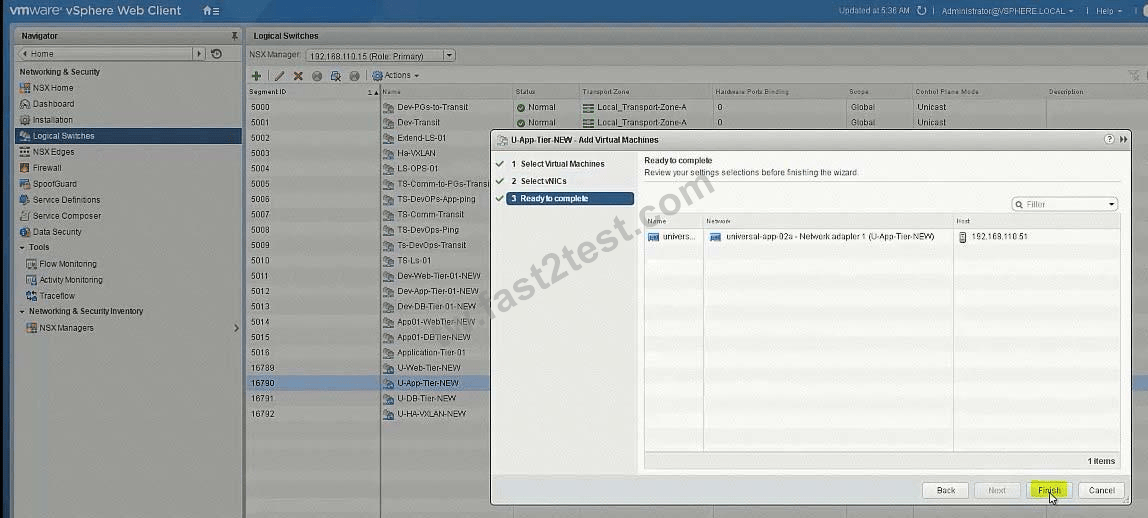
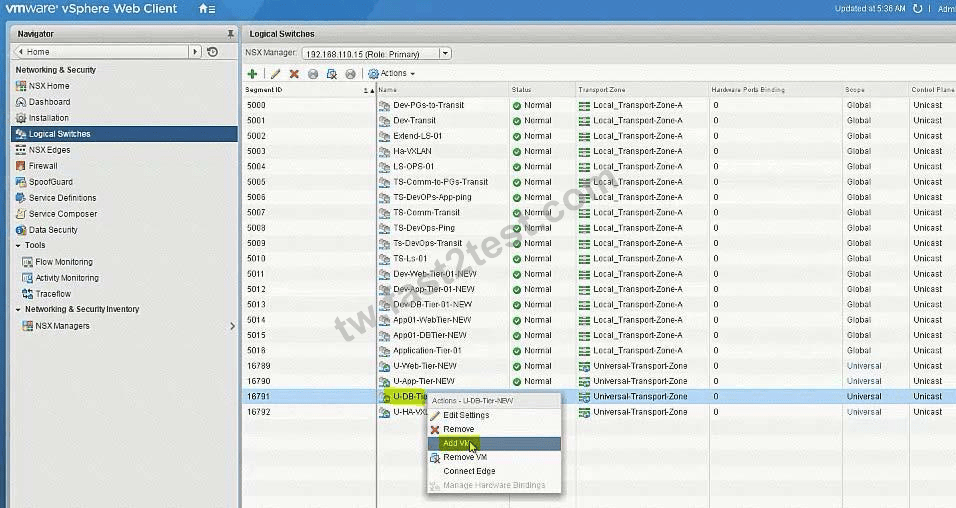
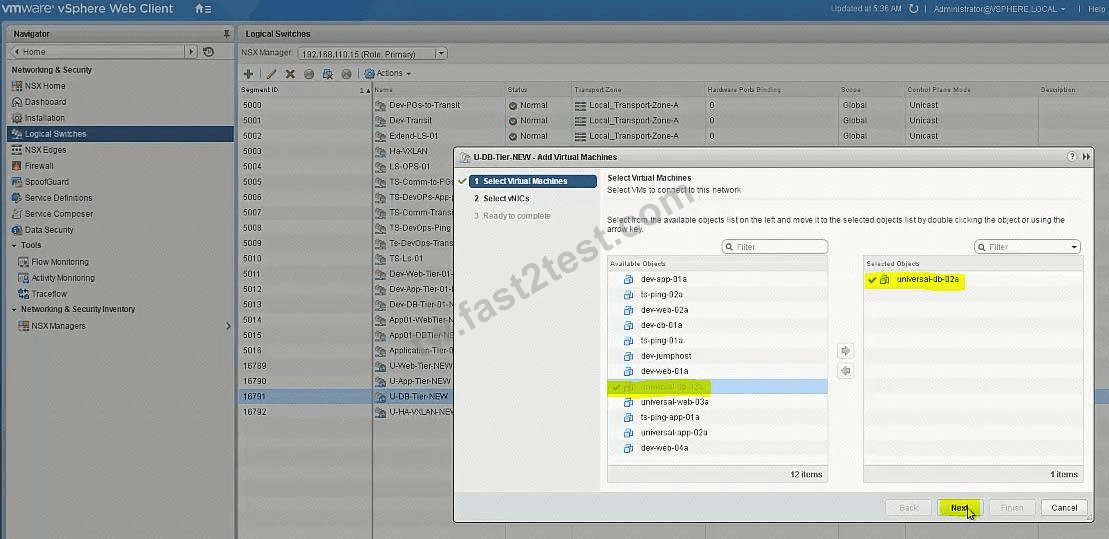


No need
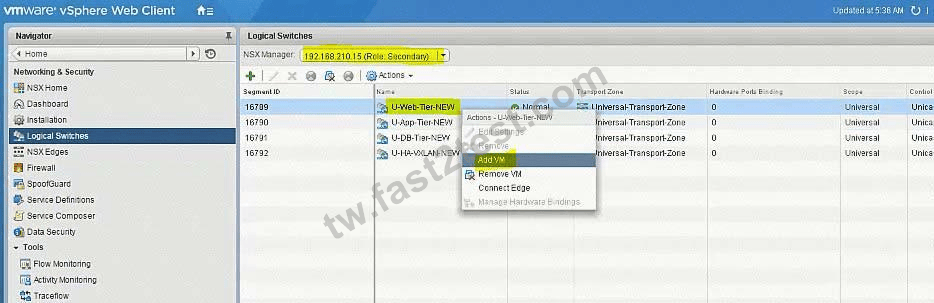
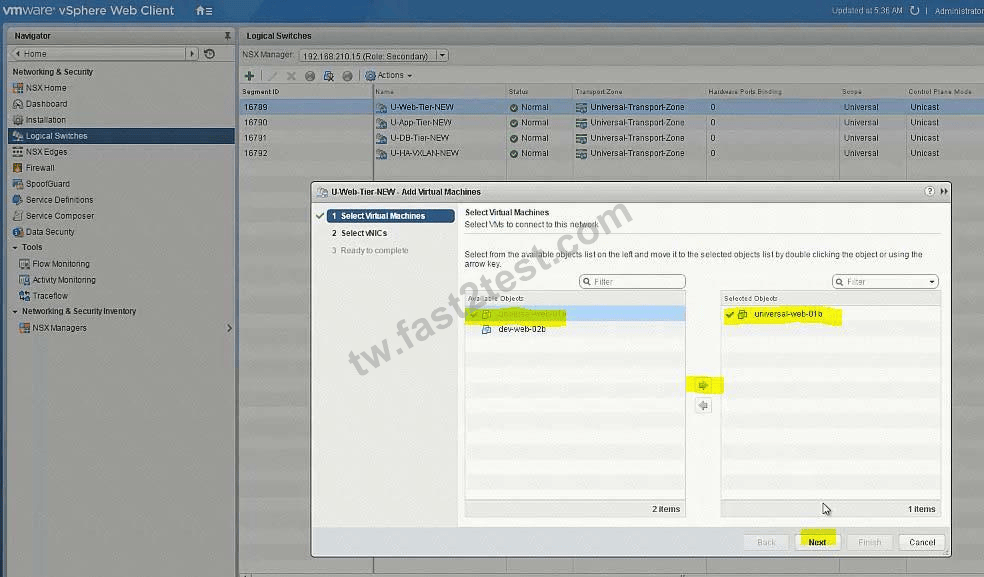
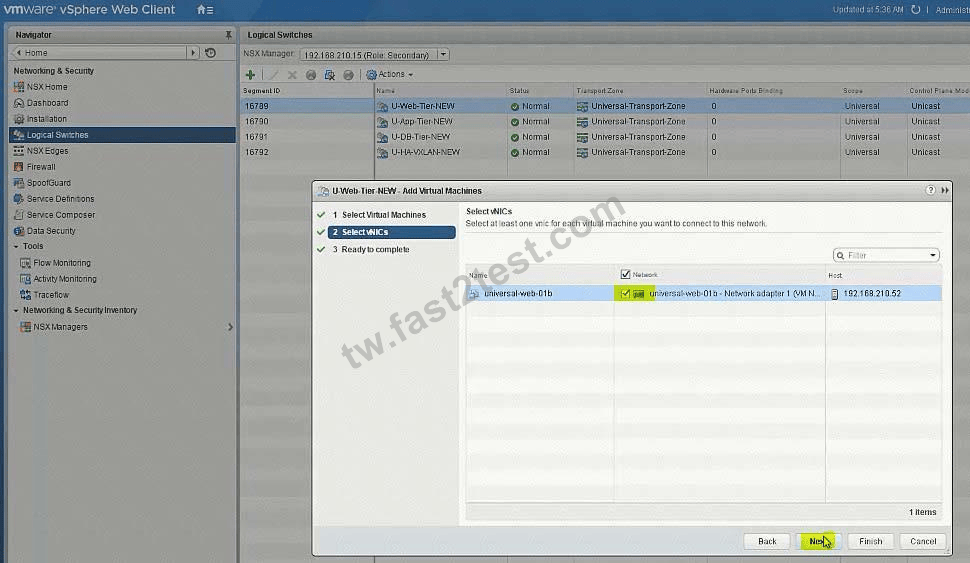
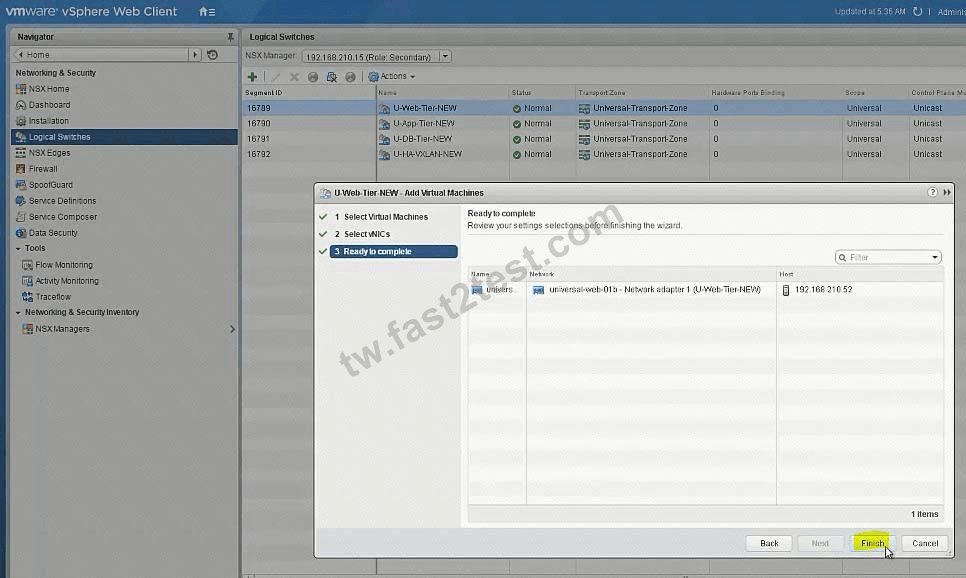
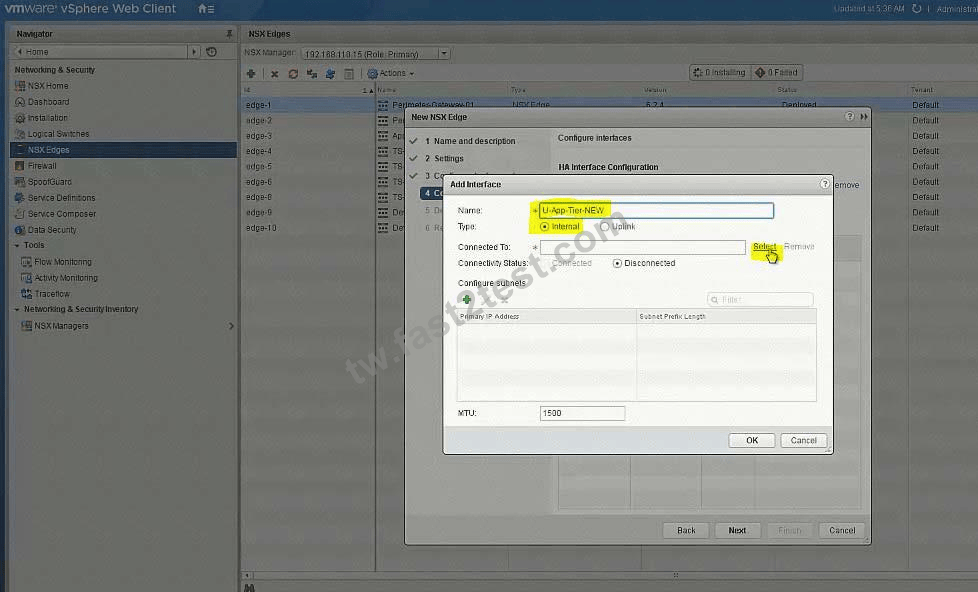
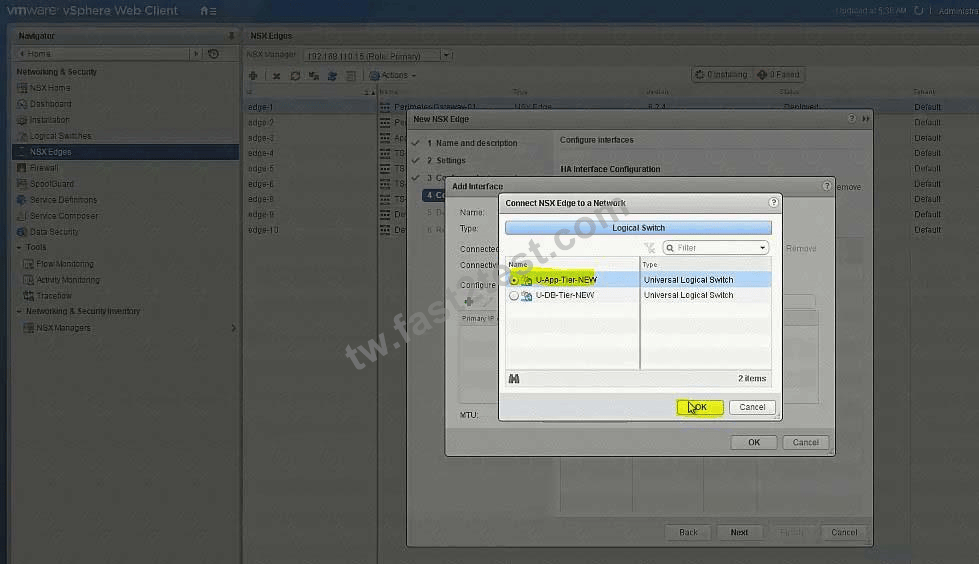
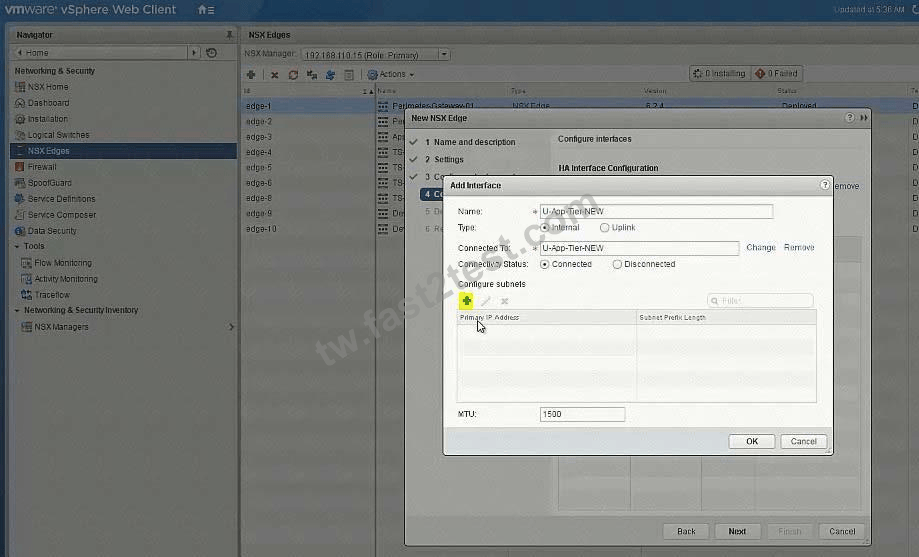
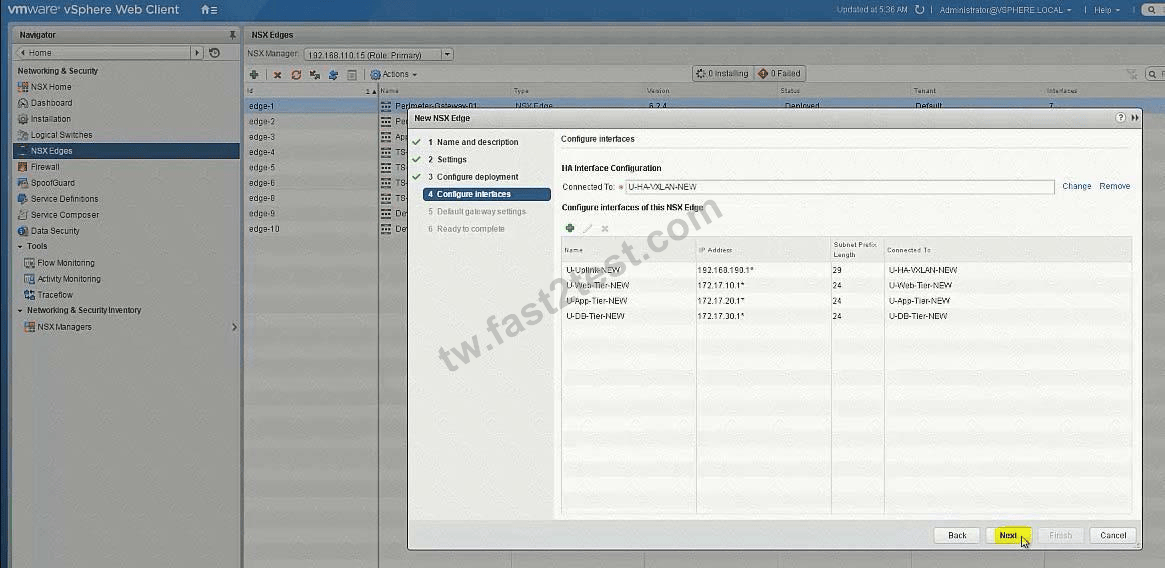
Create new Universal Logical (Distributed) Router:
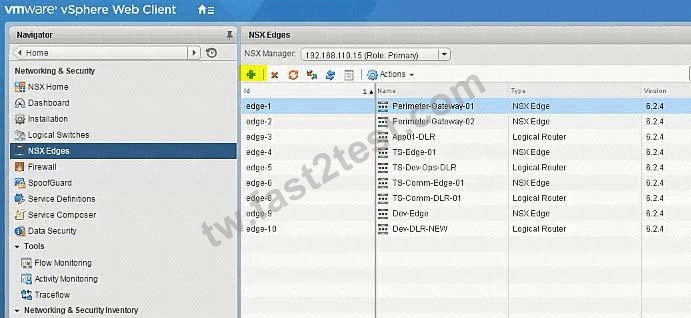
U-DLR-NEW
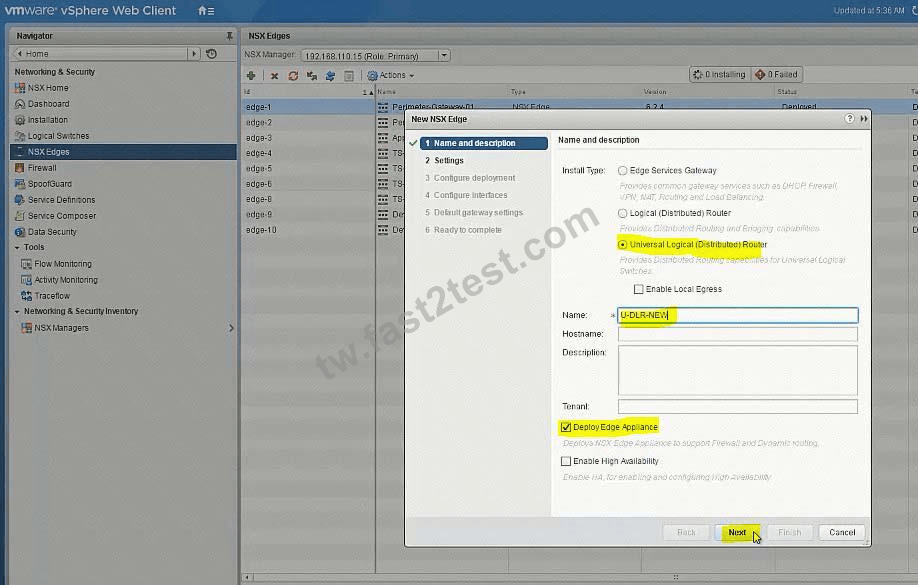
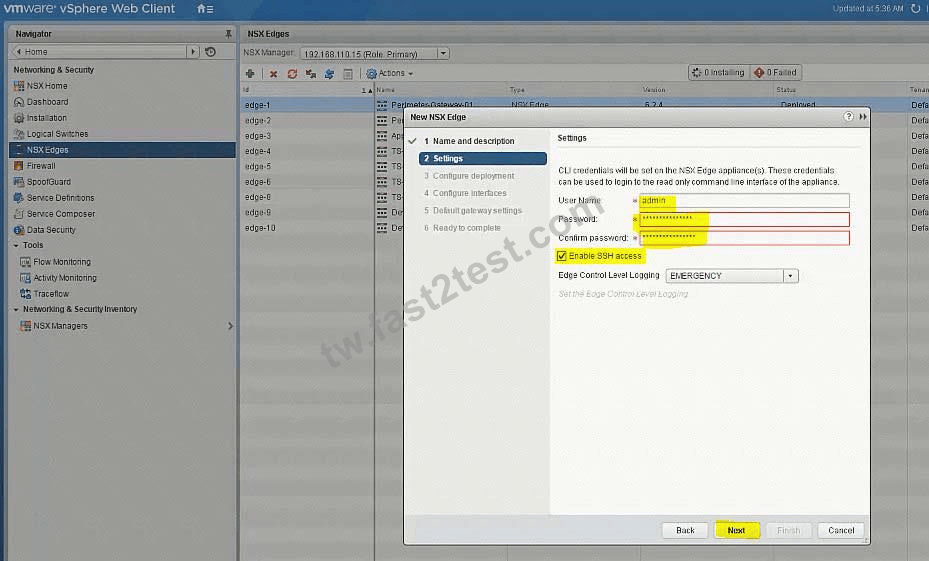
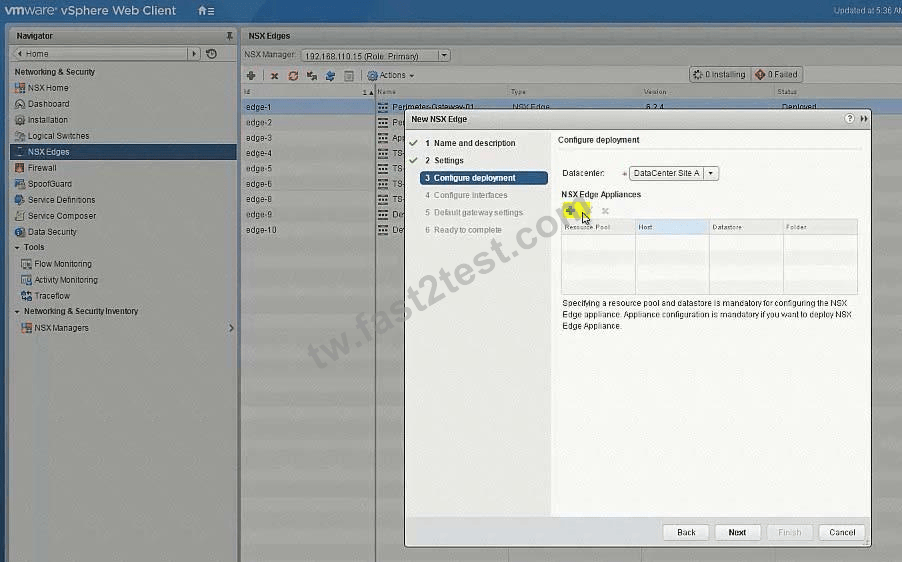
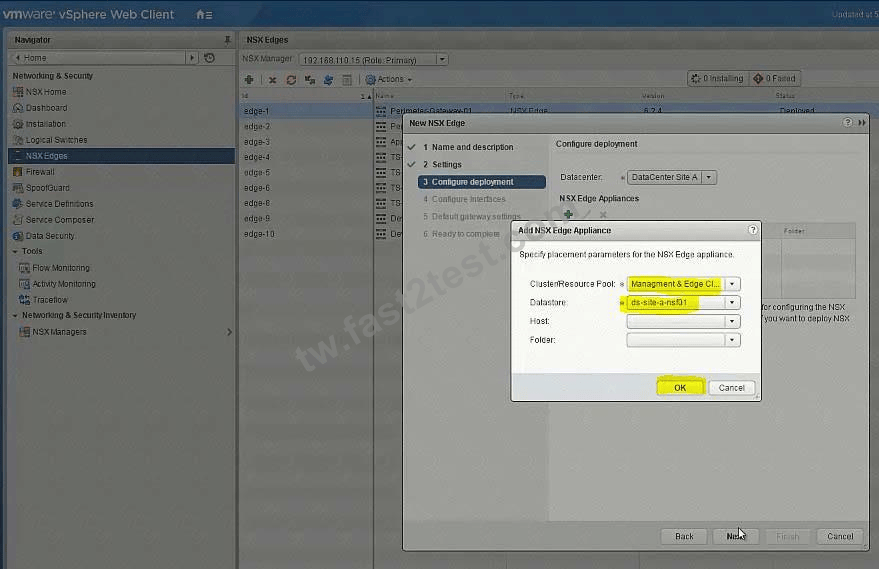
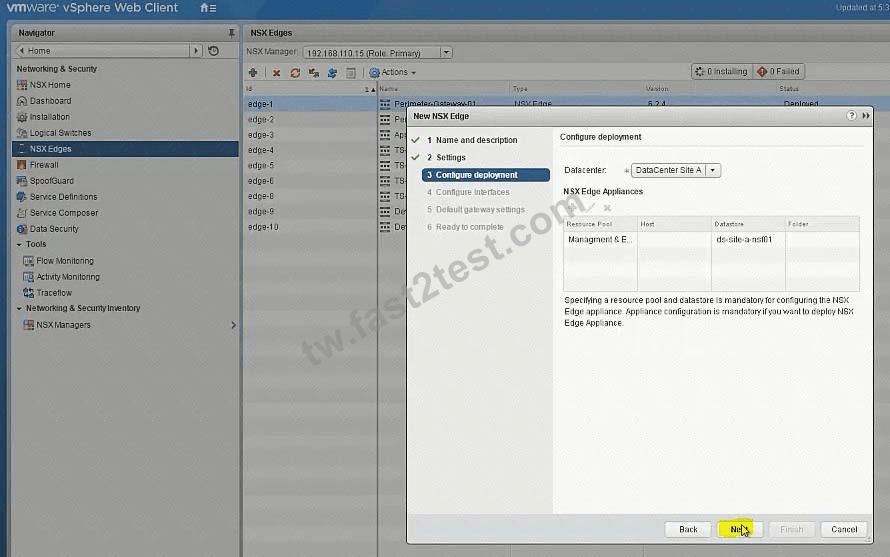
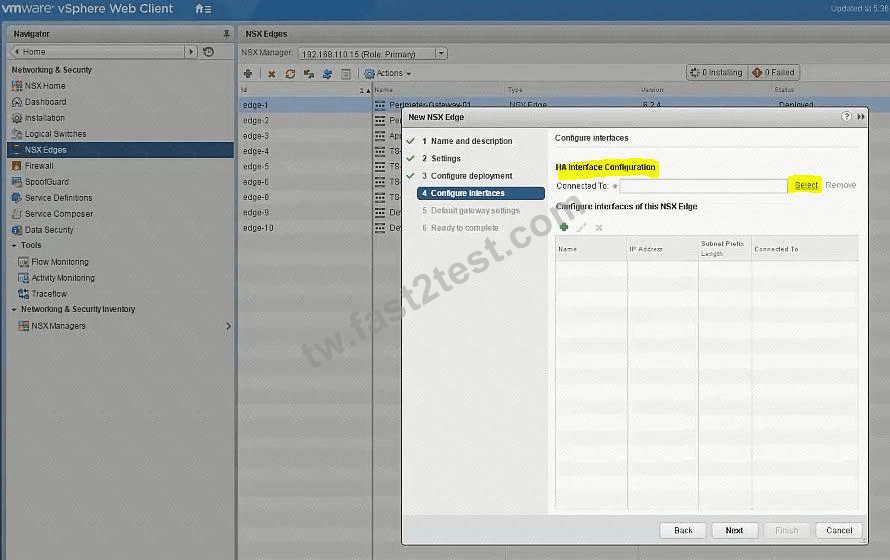
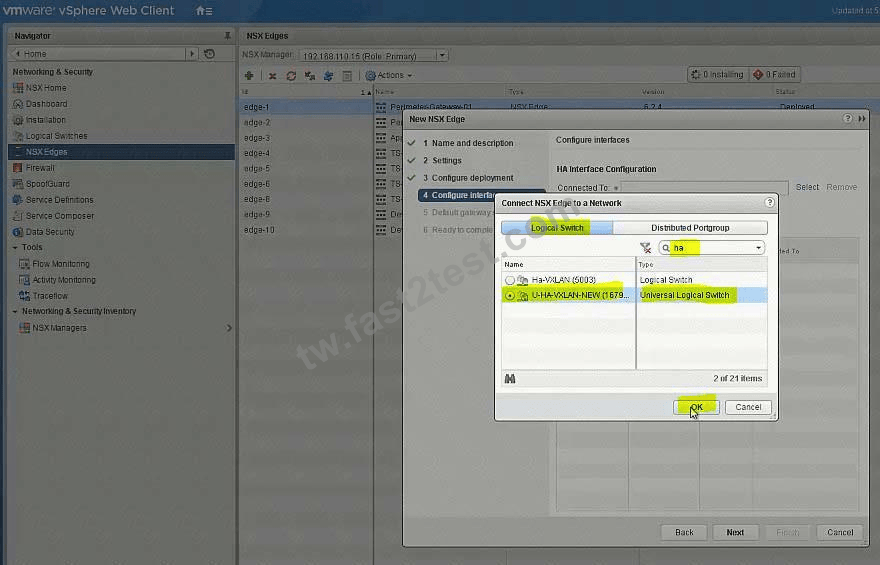

U-Uplink-NEW(U-Transit-NEW)
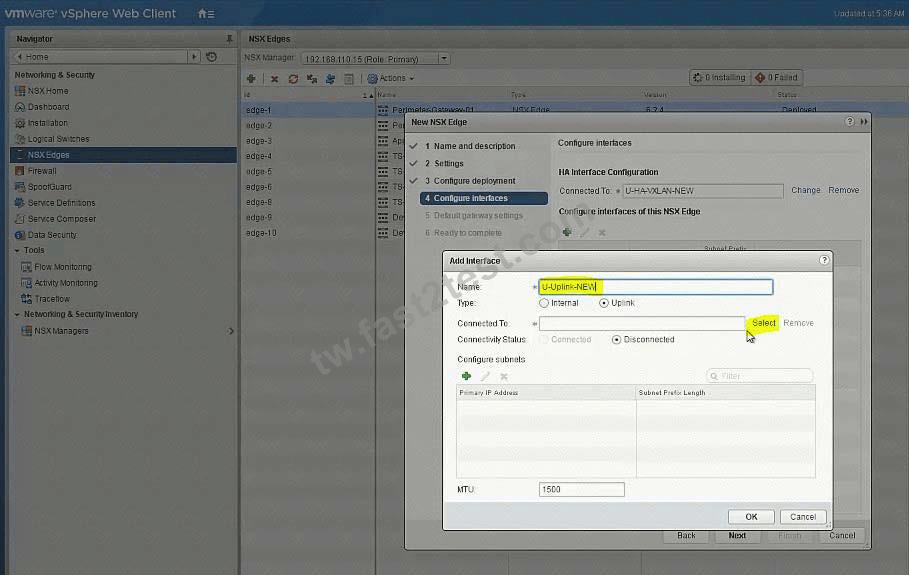
Select U-Transit-NEW logical swicth here



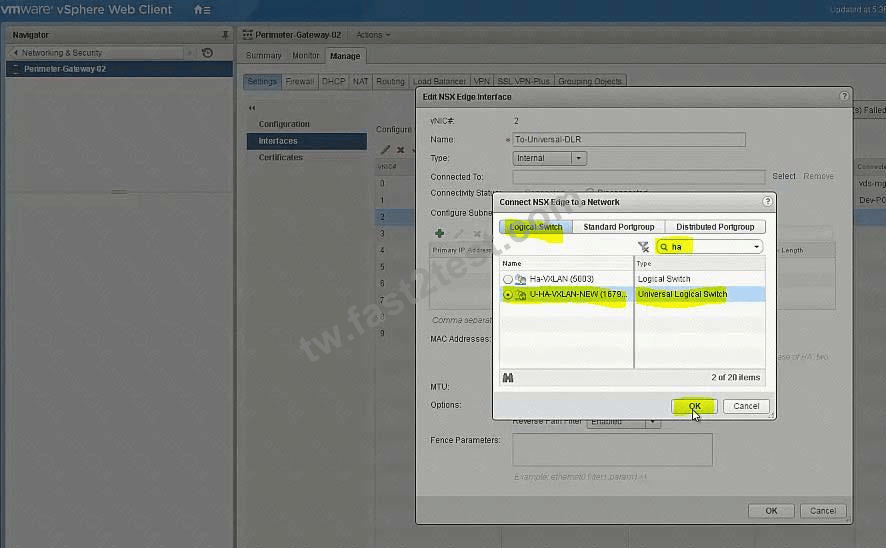
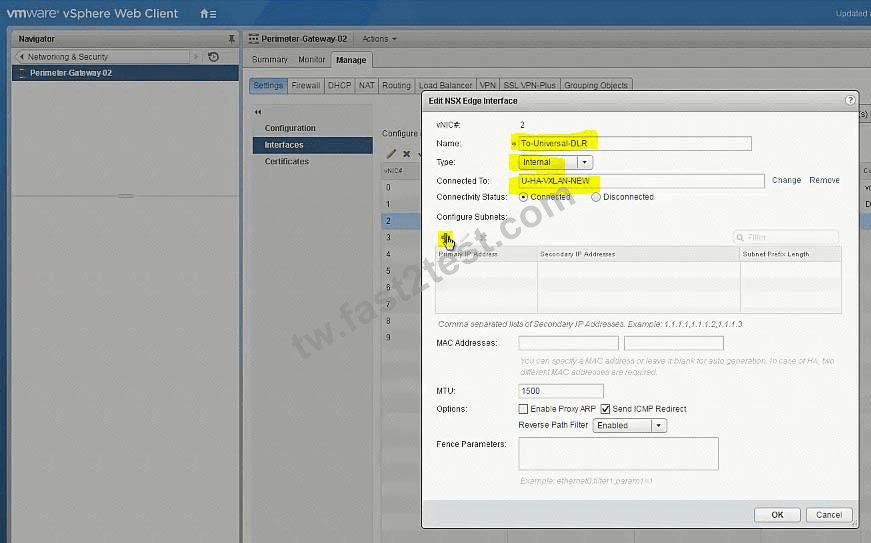
Perimeter-Gateway-02

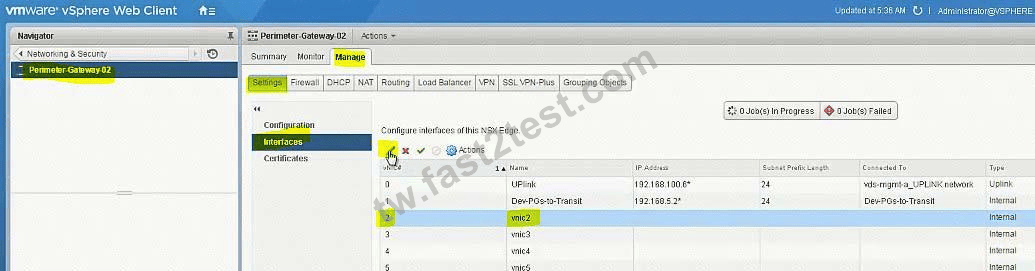
To-Universal-DLR
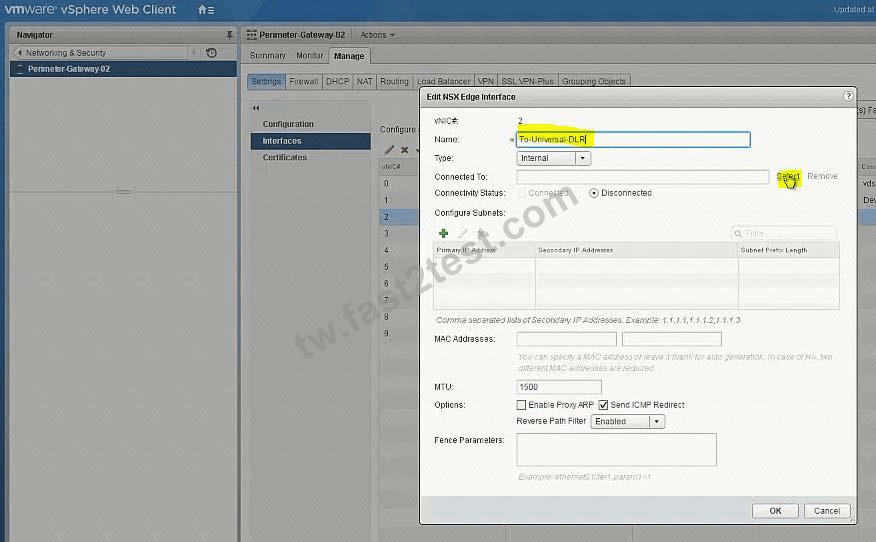
Select U-Transit-NEW
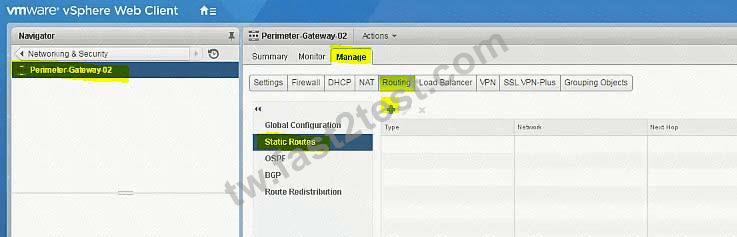
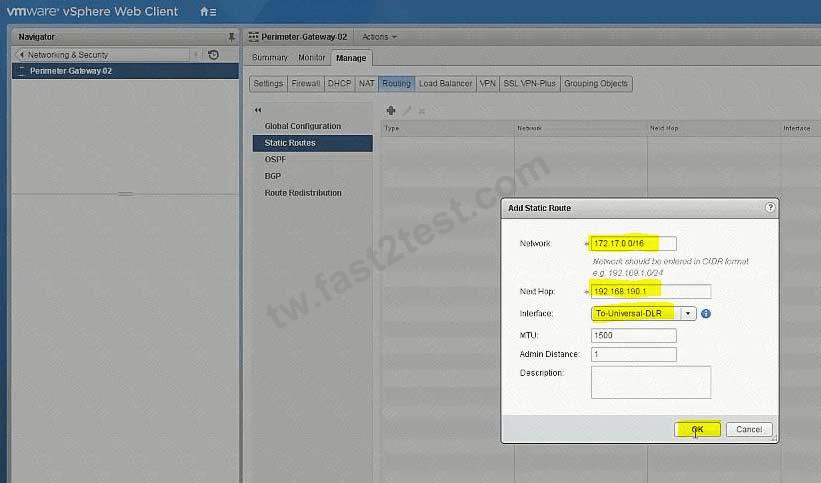

172.17.0.0/16
192.168.190.1
To-Universal-DLR
universal transport zone
logical switches
U-HA-VXLAN-NEW
U-Transit-NEW
U-Web-Tier-NEW
U-App-Tier-New
U-DB-Tier-New
New DLR U-DLR-NEW
HA Interface - U-HA-VXLAN-NEW
Interface below
- U-Transit-NEW uplink 192.168.190.1
- U-Web-Tier-NEW internal 172.17.10.1
- U-App-Tier-NEW internal 172.17.20.1
- U-Db-Tier-NEW internal 172.17.30.1
Gateway
-U-Transit-NEW
Ip 192.168.190.2
PGW02 vnic4 U-Transit-NEW 192.168.190.2
Create 5 logical switches
U-Transit-NEW
U-Web-Tier-NEW
U-App-Tier-NEW
U-DB-Tier-NEW
Add VMs to relevant newly created Logical Switches.
No need
Create new Universal Logical (Distributed) Router:
U-DLR-NEW
U-Uplink-NEW(U-Transit-NEW)
Select U-Transit-NEW logical swicth here
Perimeter-Gateway-02
To-Universal-DLR
Select U-Transit-NEW
172.17.0.0/16
192.168.190.1
To-Universal-DLR
Enable and configure cross vCenter support for and NSX implementation that contains two vCenter Servers:
vcsa-01a.corp.local and vcsa-01b.corp.local
Requirements:
vCenter: vcsa-01a.corp.local and vcsa-01b.corp.local
Credentials: [email protected] / VMware1!
NSX Manager Credentials: admin/VMware1!
The NSX Manager registered to vcsa-01a.corp.local should be responsible for all universal NSX objects.
A segment ID range of 16789-17563 is available for use with this exercise.
NOTE:
Allow time for synchronization to complete.
HOL LAB for Practice:
See the explanation part for complete solution.
vcsa-01a.corp.local and vcsa-01b.corp.local
Requirements:
vCenter: vcsa-01a.corp.local and vcsa-01b.corp.local
Credentials: [email protected] / VMware1!
NSX Manager Credentials: admin/VMware1!
The NSX Manager registered to vcsa-01a.corp.local should be responsible for all universal NSX objects.
A segment ID range of 16789-17563 is available for use with this exercise.
NOTE:
Allow time for synchronization to complete.
HOL LAB for Practice:
See the explanation part for complete solution.
正確答案:
SOLUTION:
(1) select home. select installation select NsManager - b. select
logical network preparation tab. select segment ID. edit and enter pool id 6001-7000 do the same for Nsx MAnager -a and put pool id 5001-6000. be sure there is no overlaping of segment id in both the nsx managers.
(2) open Nsx Manager a and Nsx Manager B and start the universal synchoraniztion service from summary.
note: you can start the services in the beging to avoid any delay
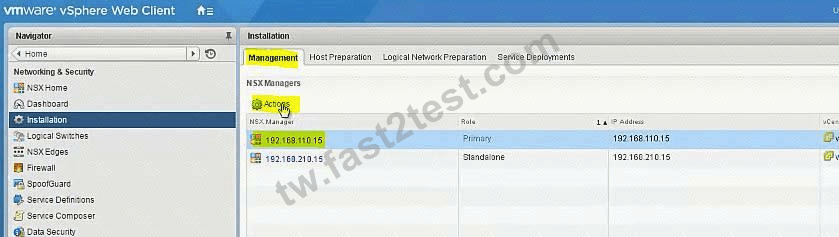
Assign Primary Role to 192.168.110.15

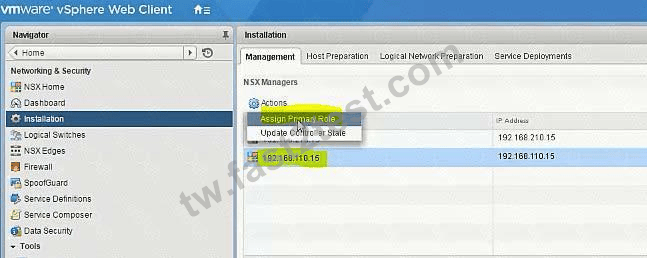



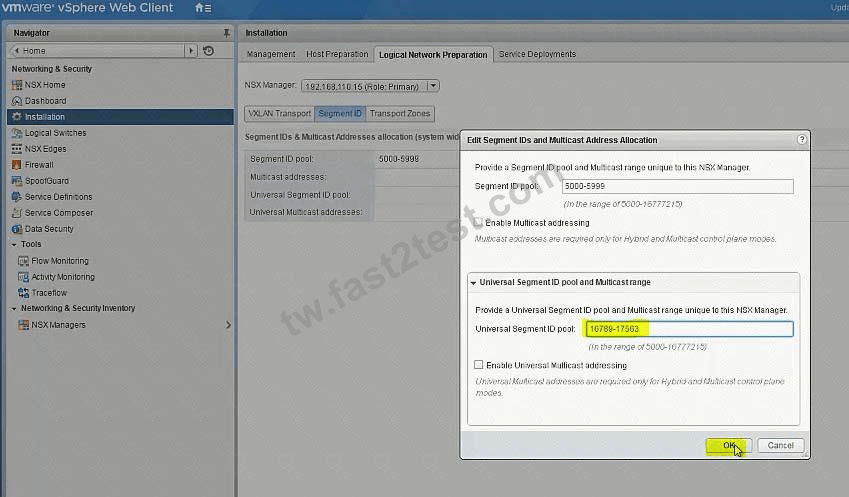
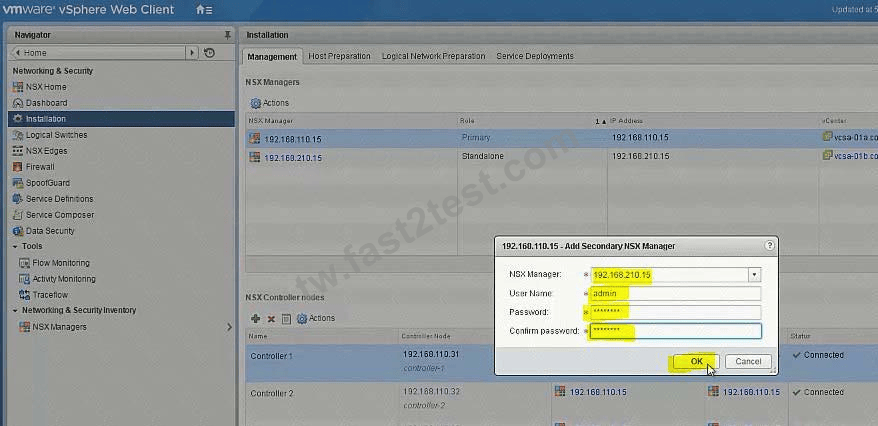
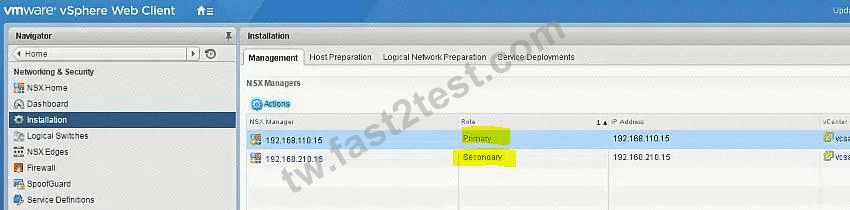
Add Secondary NSX Manager


(1) select home. select installation select NsManager - b. select
logical network preparation tab. select segment ID. edit and enter pool id 6001-7000 do the same for Nsx MAnager -a and put pool id 5001-6000. be sure there is no overlaping of segment id in both the nsx managers.
(2) open Nsx Manager a and Nsx Manager B and start the universal synchoraniztion service from summary.
note: you can start the services in the beging to avoid any delay
Assign Primary Role to 192.168.110.15
Add Secondary NSX Manager
Management has approved an expansion of the virtual infrastructure. You have been tasked to prepare Cross vCenter configuration with the second vCenter Server. Another administrator has provided a pre-configured vDS configuration file located on the Control Center Server. All identifiers must be maintained.
Requirements:
vCenterB server: vcsa-01b.corp.local
Credentials: [email protected] / VMware1!
vCenterB VAMI Credentials: root / VMware1!
Cluster: Computer Cluster 1B
ESXI Hosts: esx-01b.corp.local, esx-02.corp.local
Platform service controller: psc-01a.corp.local(192.168.110.9)
NSX Manager: nsmgr-01b.corp.local (192.168.210.15)
Credentials: admin / VMware1!
Time Zone: US/Pacific
*Configure nsmgr-01b.corp.local for vCenterB and psc-01a.corp.local
*Ensure nsxmgr-01b.corp.local uses the same NTP server as psc-01a.corp.local with a US/Pacific TimeZone.
*Import the new vDS configuration vds-site-b-Compute-New.zip
All identifiers must be maintained.
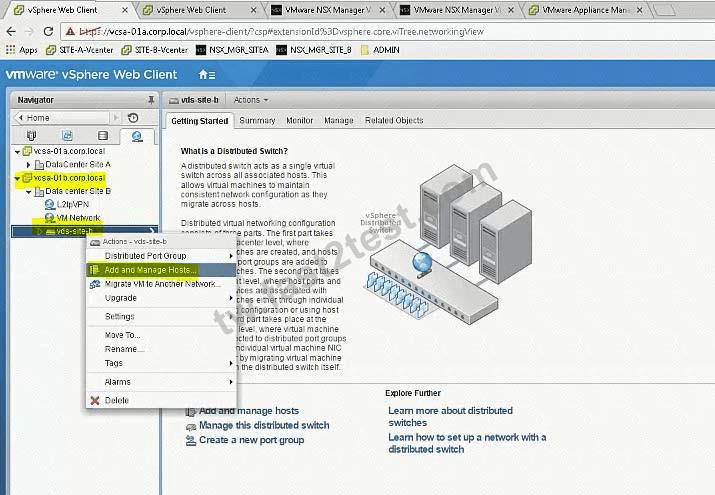
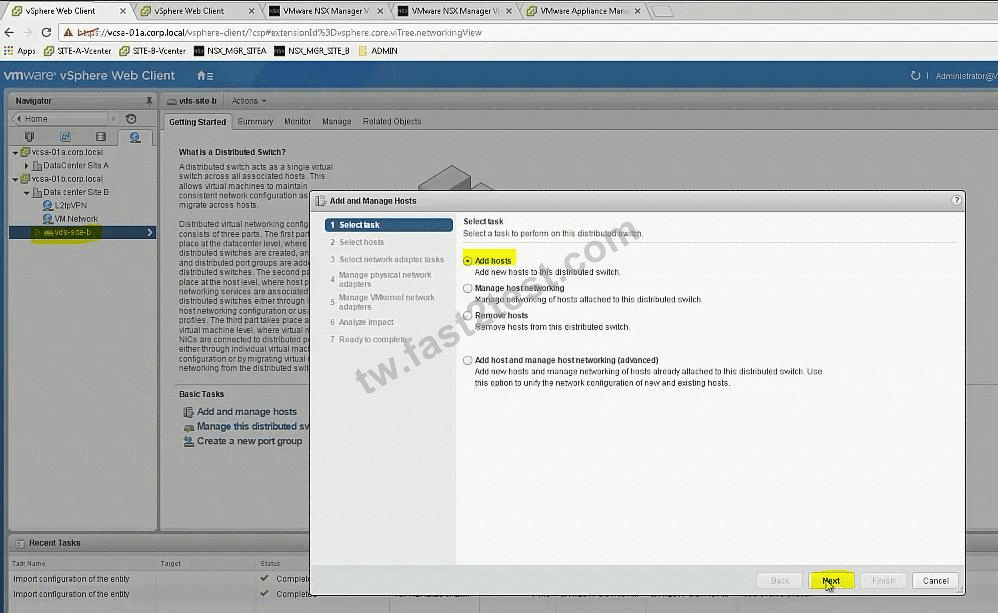
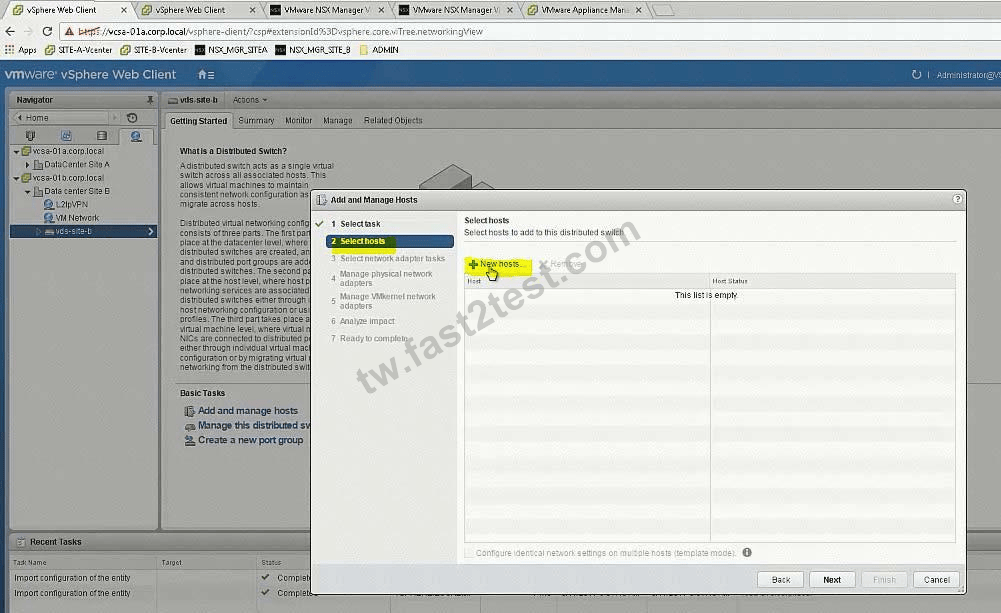
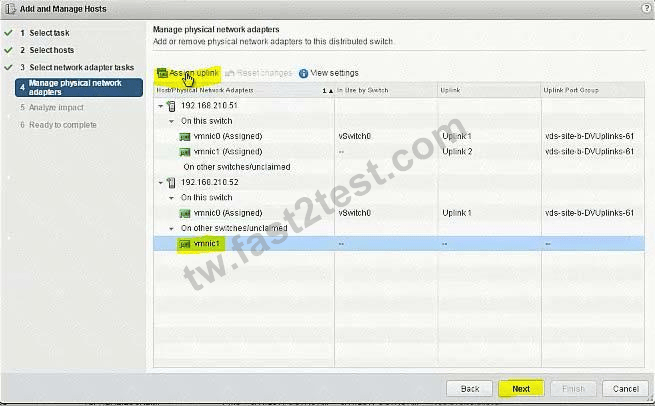
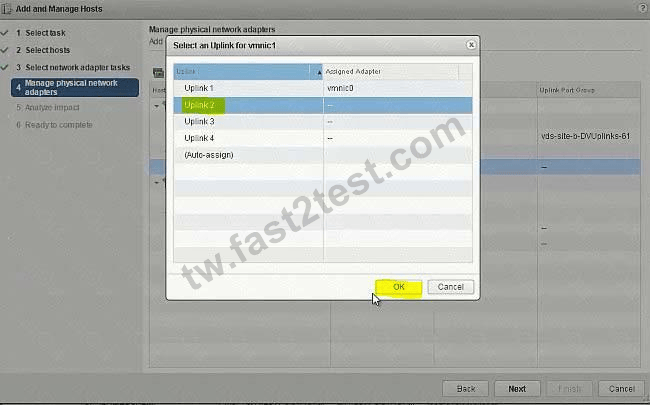
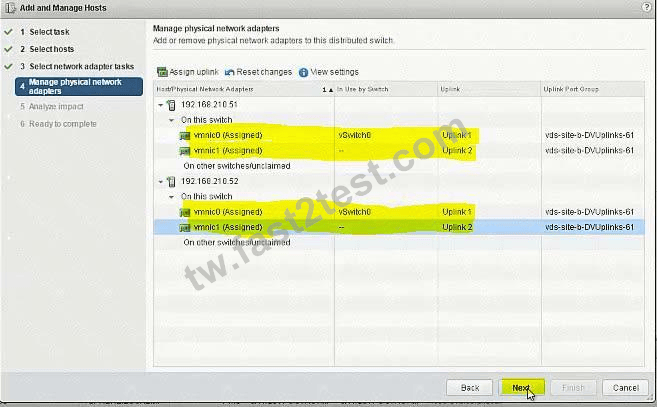
*Assign the remaining two used vmnics for the ESXi hosts to the newly imported vDS.
NOTE:
Do not migrate VMkernels from the standard switches on the hosts.
HOL LAB for Practice:
a http://docs.hol.vmware.com/hol-isim/HOL-2019/hol-1903-01-nsxinstall-p1.htm HOL-1903-01 Page 16 or you can directly Open a NSX manager in the lab and edit the existing settings bOpen PSC and NSX manager in HOL-1903-01 and look for NTP Server loand cation cExport existing vDS config and Import back the config for practice in HOL-1903-01 dNo Lab Module available See the explanation part for complete solution.
Requirements:
vCenterB server: vcsa-01b.corp.local
Credentials: [email protected] / VMware1!
vCenterB VAMI Credentials: root / VMware1!
Cluster: Computer Cluster 1B
ESXI Hosts: esx-01b.corp.local, esx-02.corp.local
Platform service controller: psc-01a.corp.local(192.168.110.9)
NSX Manager: nsmgr-01b.corp.local (192.168.210.15)
Credentials: admin / VMware1!
Time Zone: US/Pacific
*Configure nsmgr-01b.corp.local for vCenterB and psc-01a.corp.local
*Ensure nsxmgr-01b.corp.local uses the same NTP server as psc-01a.corp.local with a US/Pacific TimeZone.
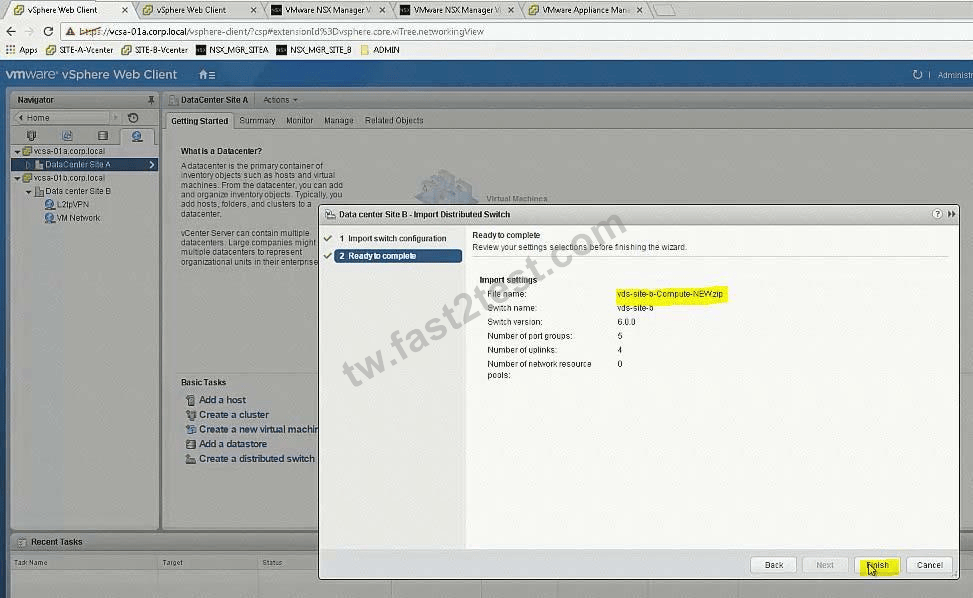
*Import the new vDS configuration vds-site-b-Compute-New.zip
All identifiers must be maintained.
*Assign the remaining two used vmnics for the ESXi hosts to the newly imported vDS.
NOTE:
Do not migrate VMkernels from the standard switches on the hosts.
HOL LAB for Practice:
a http://docs.hol.vmware.com/hol-isim/HOL-2019/hol-1903-01-nsxinstall-p1.htm HOL-1903-01 Page 16 or you can directly Open a NSX manager in the lab and edit the existing settings bOpen PSC and NSX manager in HOL-1903-01 and look for NTP Server loand cation cExport existing vDS config and Import back the config for practice in HOL-1903-01 dNo Lab Module available See the explanation part for complete solution.
正確答案:
SOLUTION:
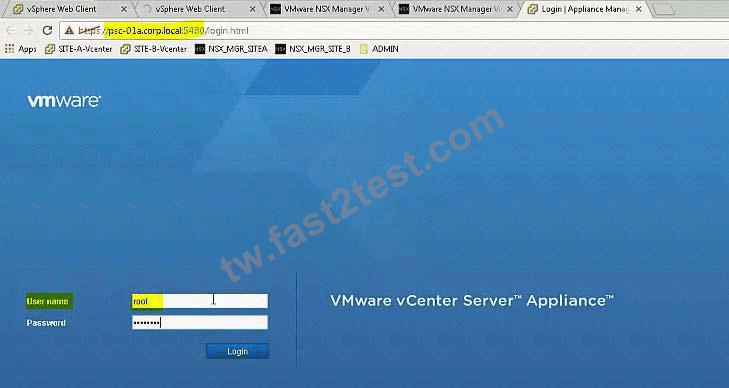
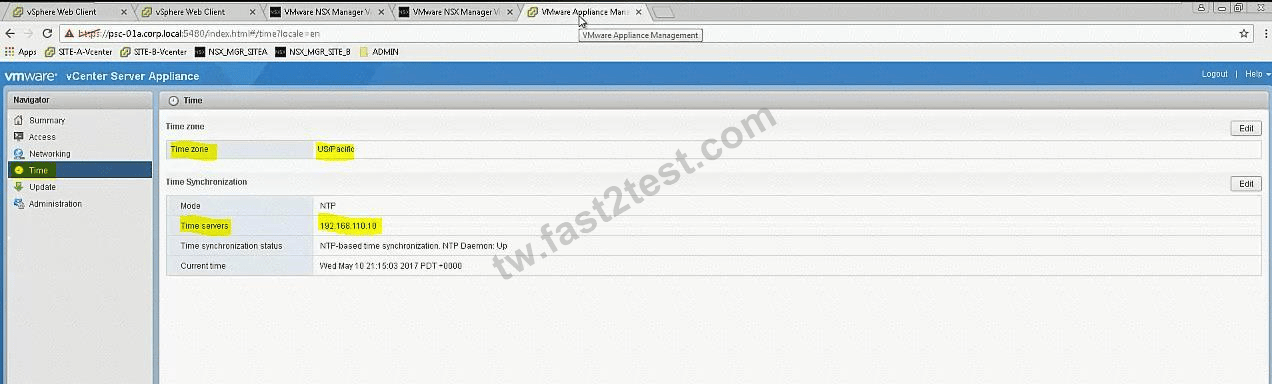
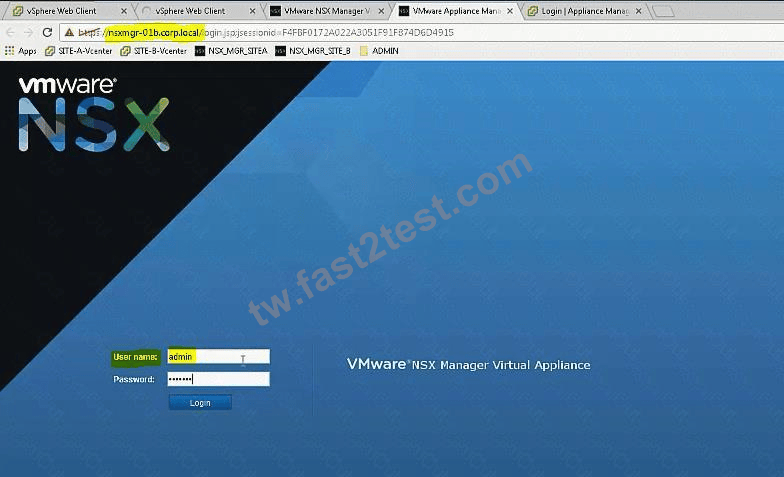
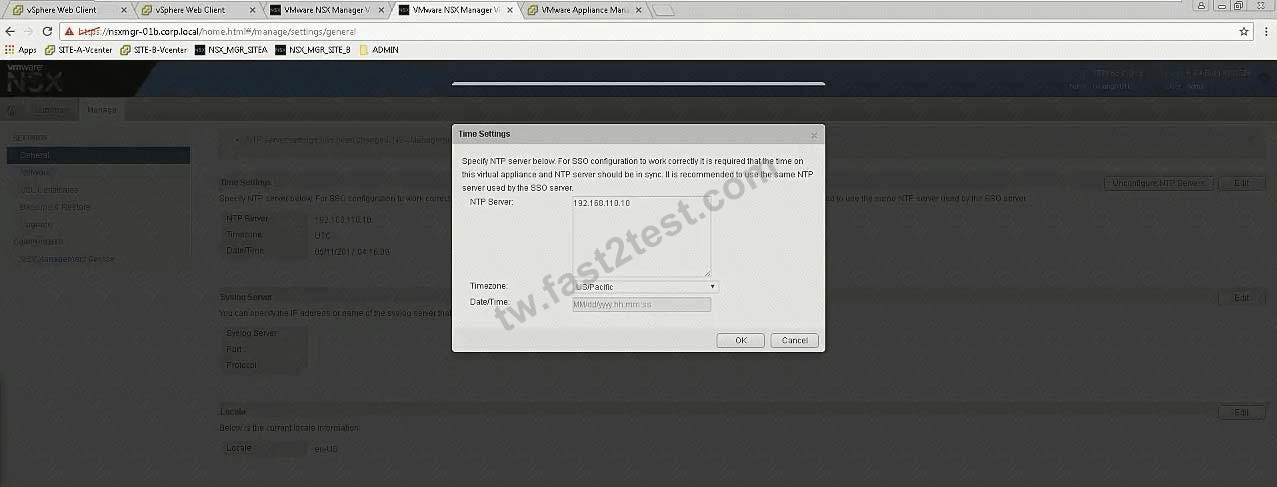
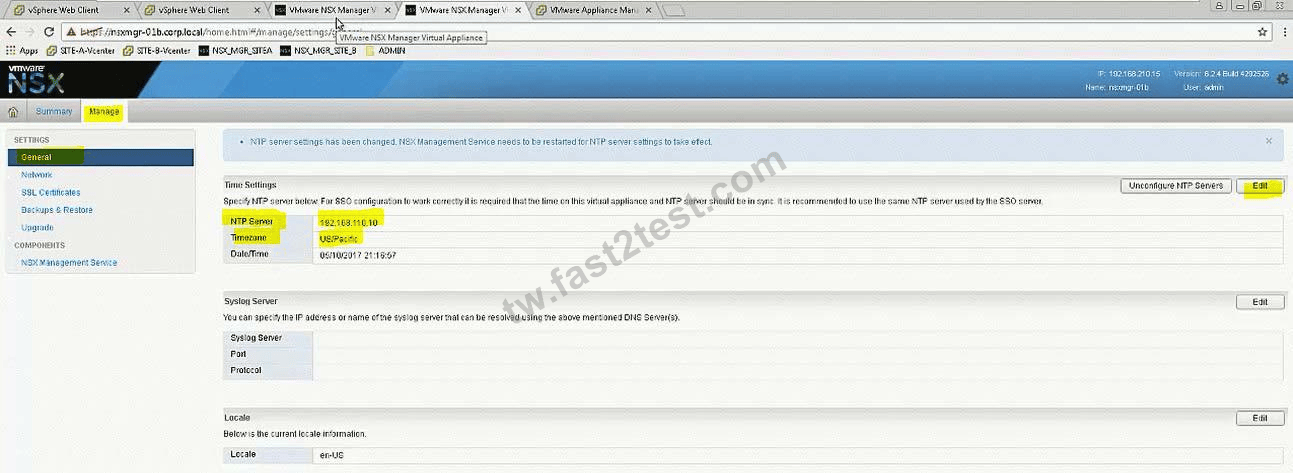
Step 1: Login to PSC using VAMI credentials and note down the time zone and server details and use the same in SiteB NSX Manager time settings.
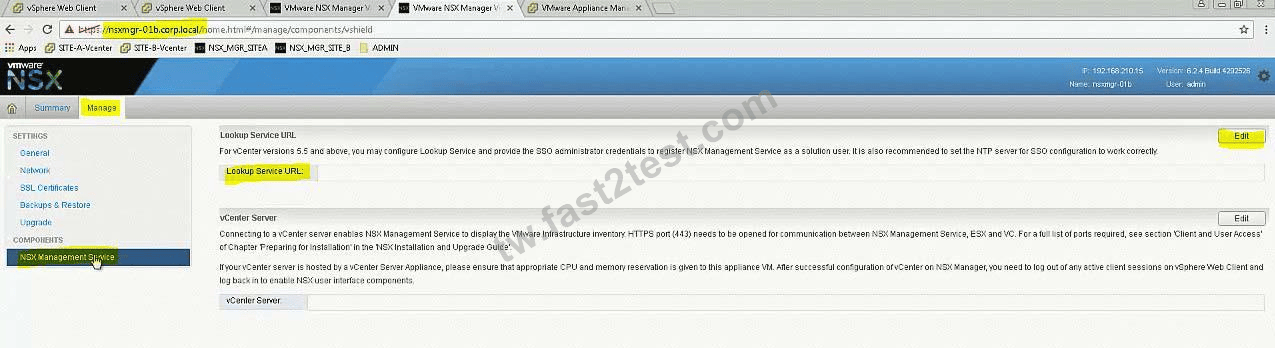
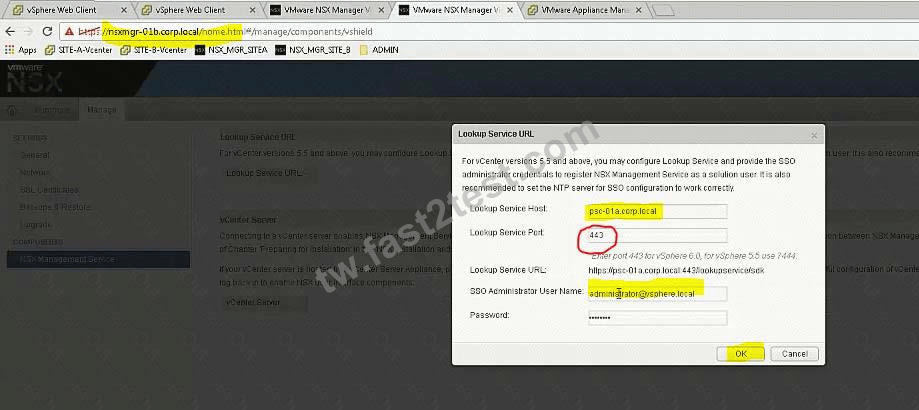
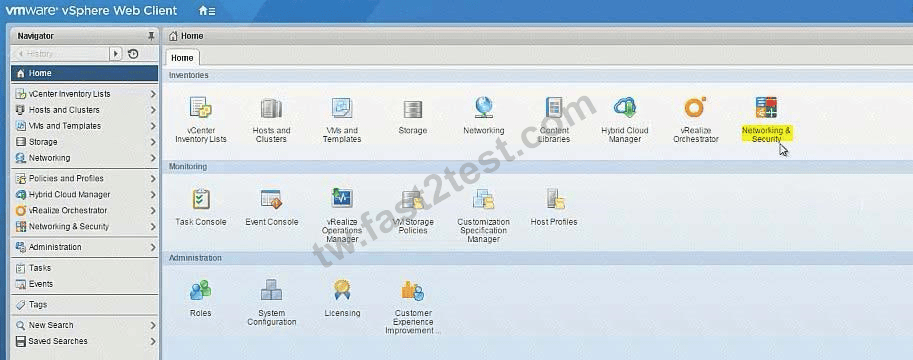
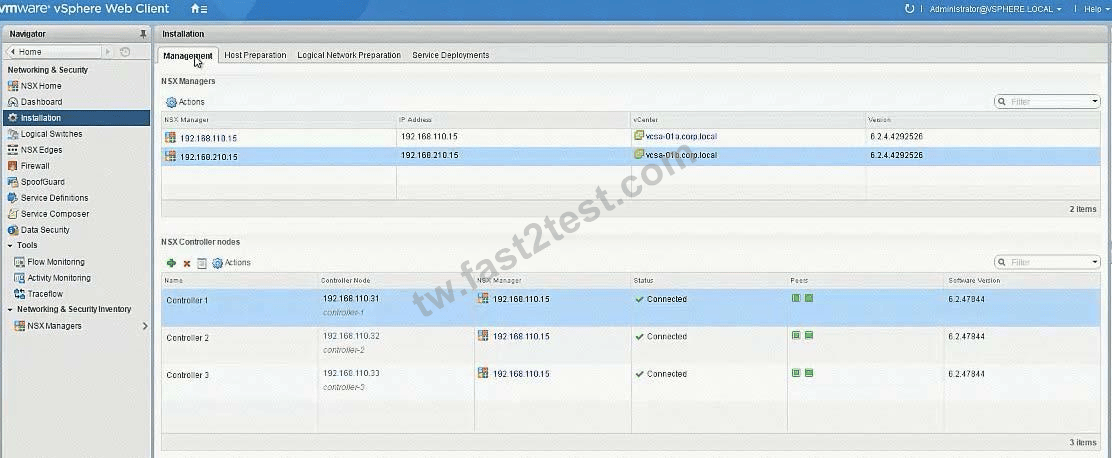
Step 2: Update the time settings, complete lookup service configuration, associate SiteB NSX manager to SiteB vCenter. Check the status from SiteA vCenter Webclient -> Networking & Security -> Installation -> Management.
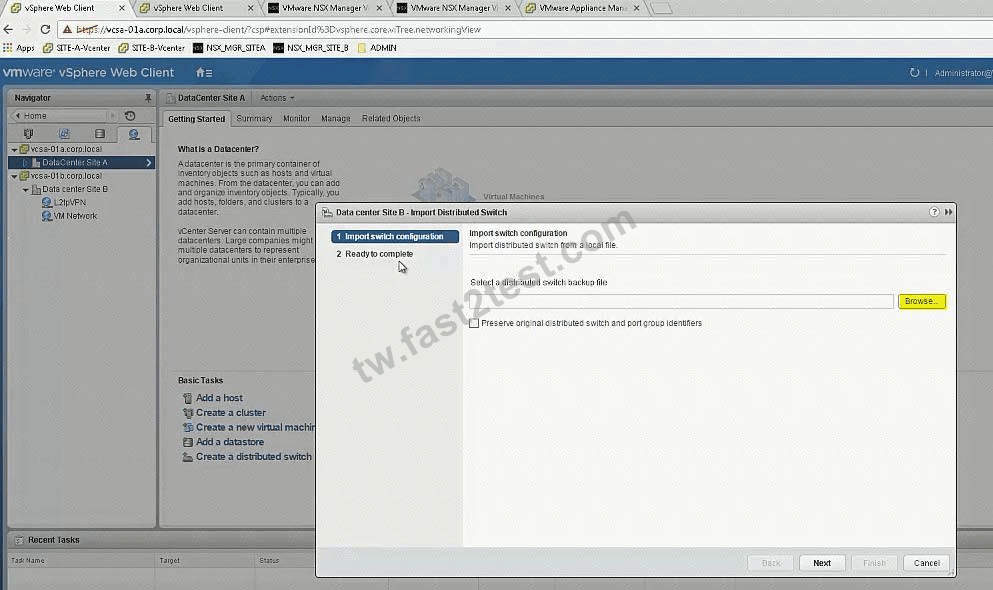
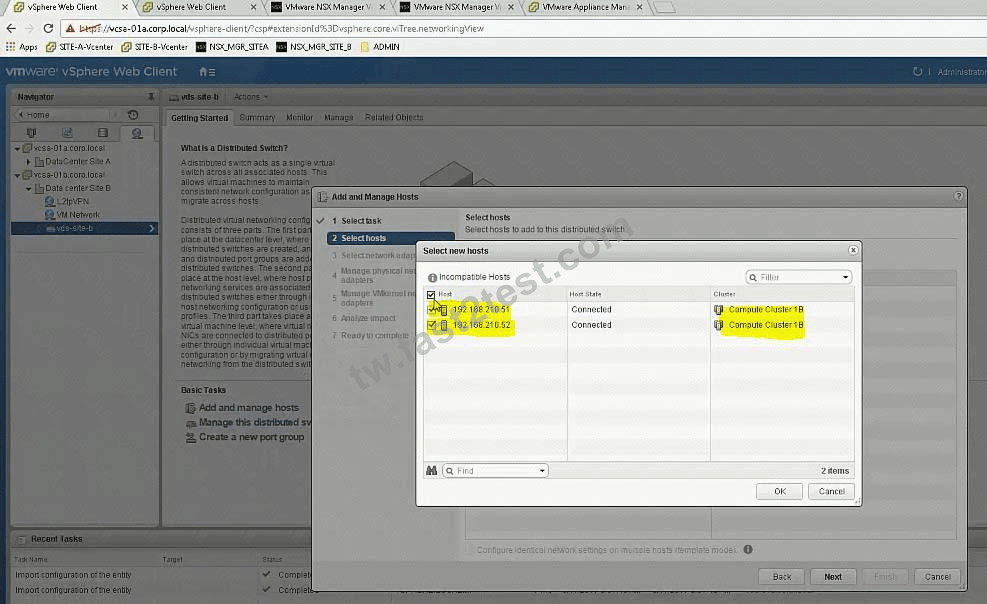
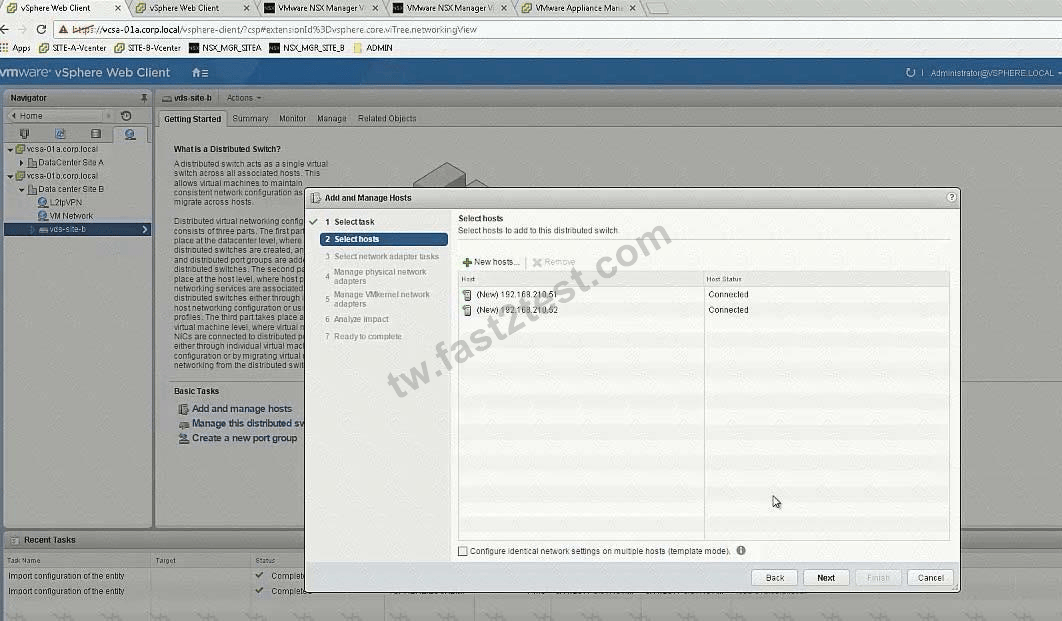
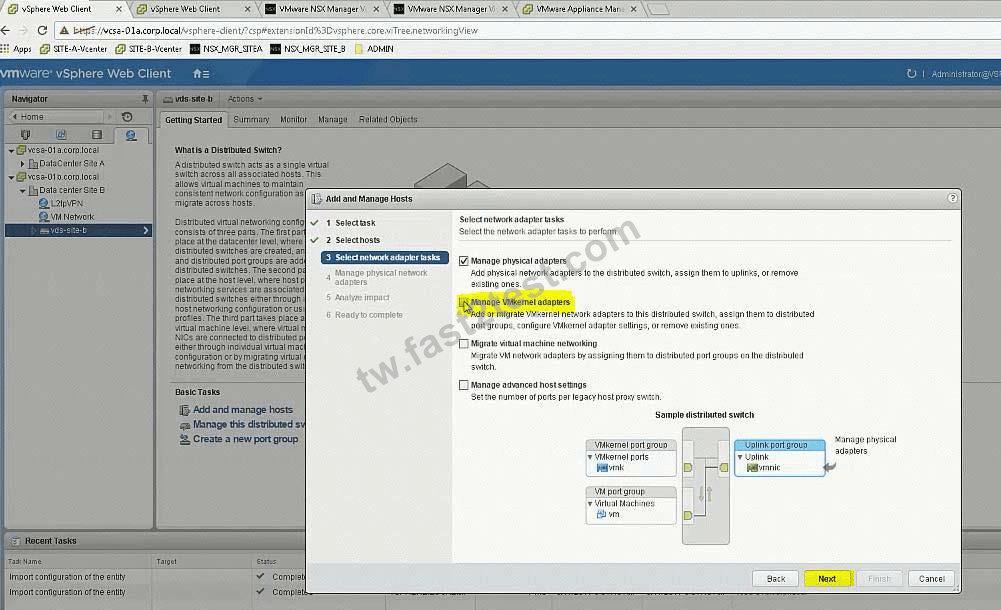
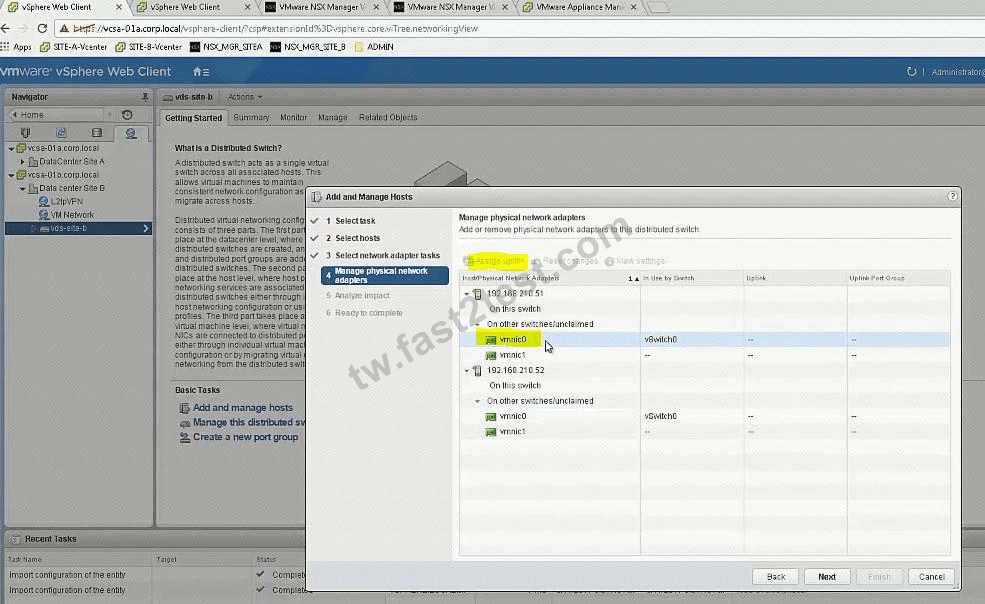
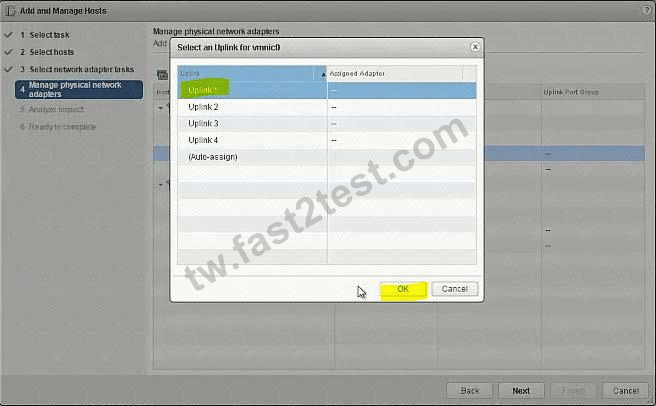
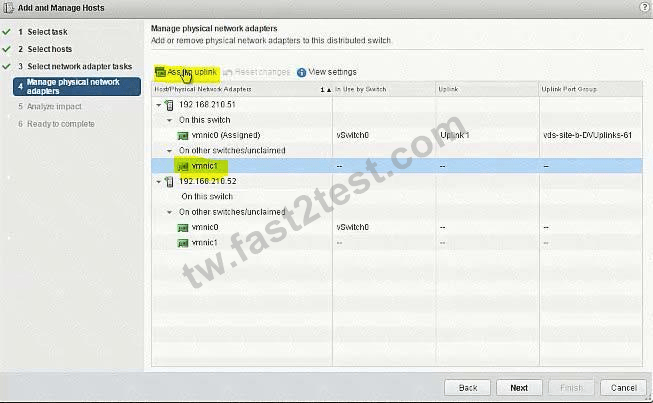
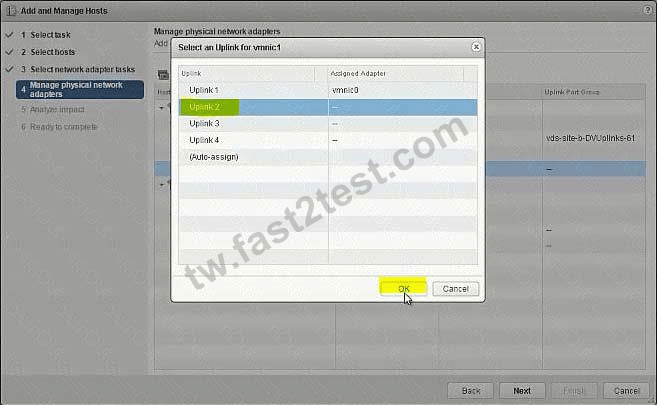
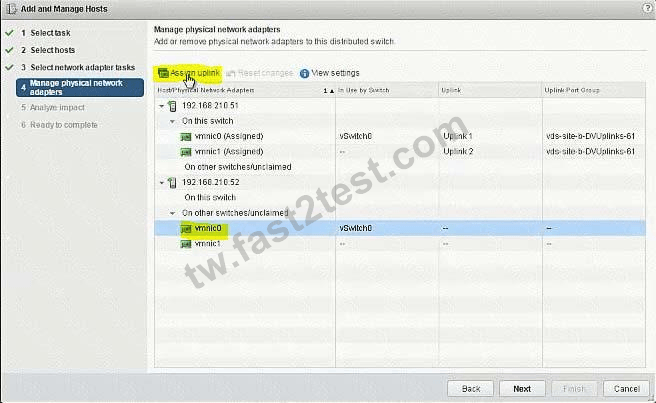
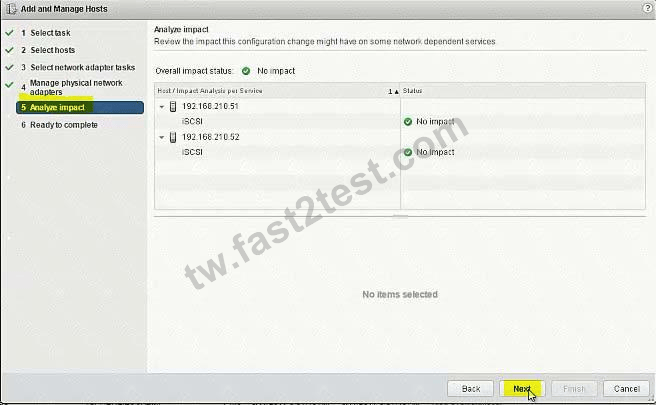
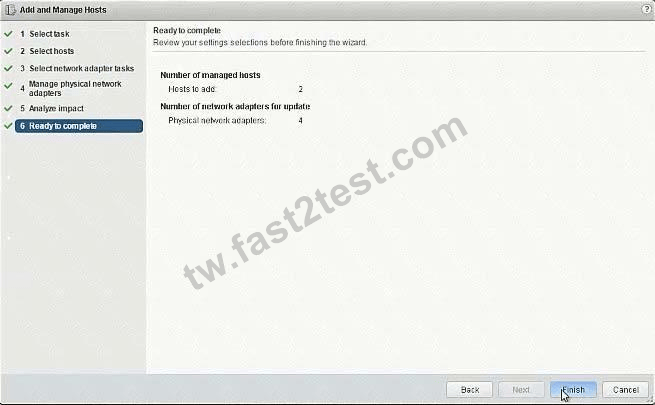
Step 3: Import the Distributed switch to Cluster B, add the hosts & assign the interfaces.
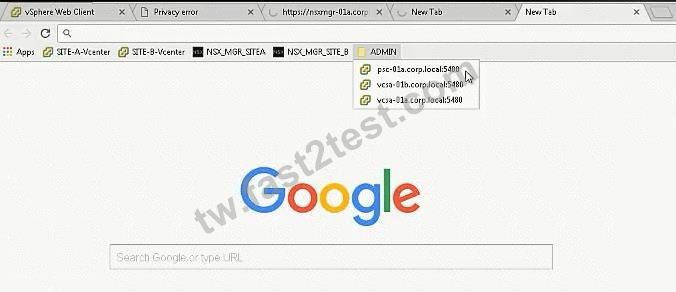
Login to https://psc-01a.corp.local:5480/ to check the NTP server details and note it down. Use the VAMI credentials given to login. Need to click on Edit to see the server details in here as it is not showing up in the main page (In exam, it is showing in the main page itself).
Important NOTE:
In exam change Lookup Service Port according to NSX Manager of Site A which is working one.
It's 7444 in exam.
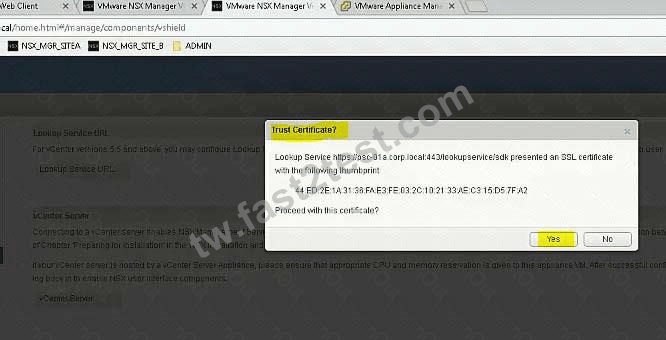
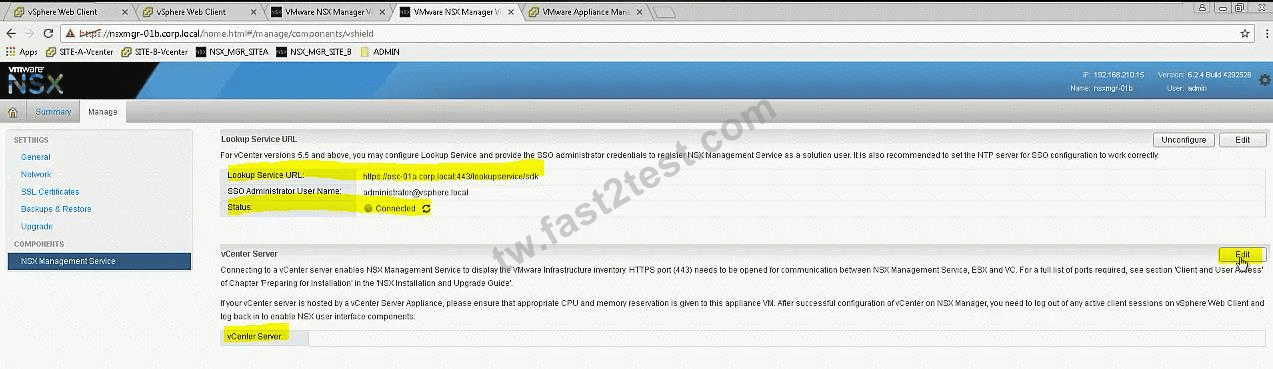
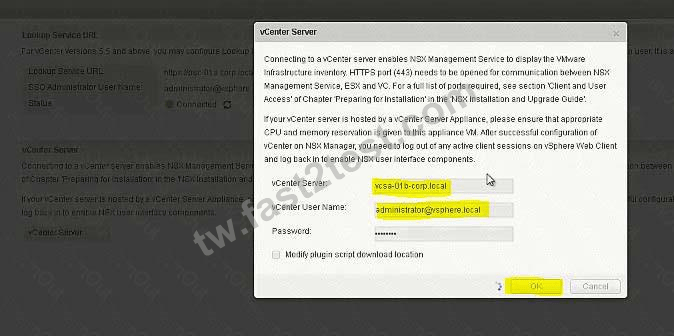
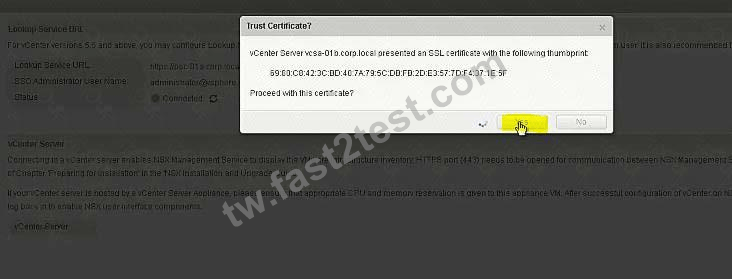
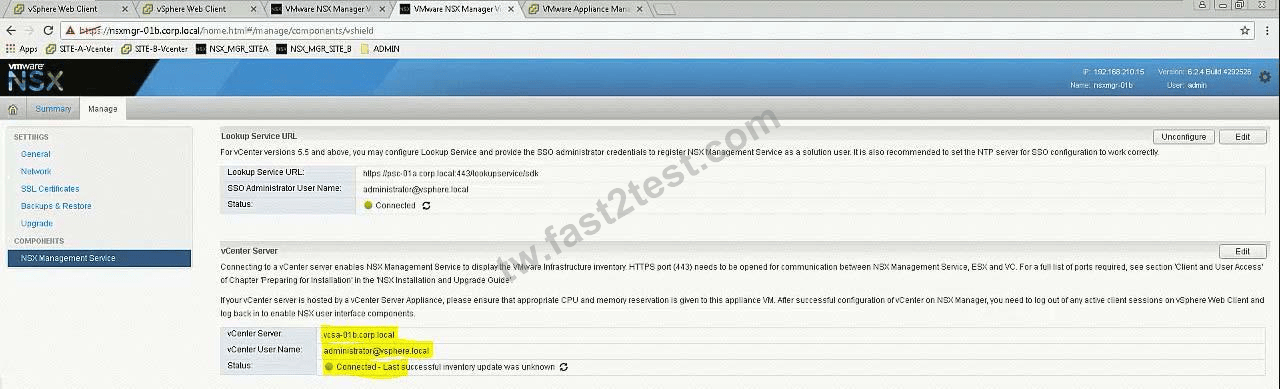
Click refresh if in case it shows as disconnected.
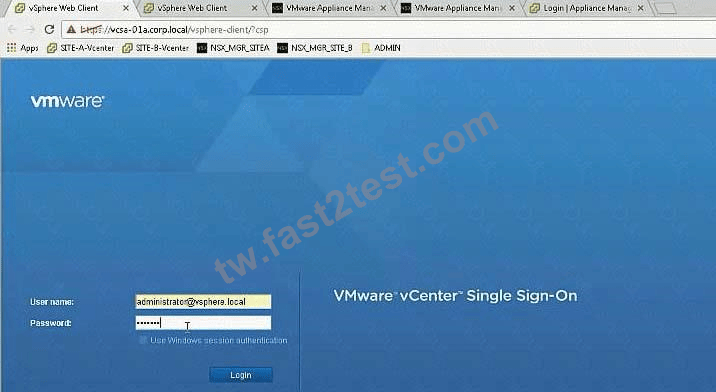
Login to SiteA vCenter using Web Client and confirm the status of both the NSX Managers: Installation -> Management.


Step 1: Login to PSC using VAMI credentials and note down the time zone and server details and use the same in SiteB NSX Manager time settings.
Step 2: Update the time settings, complete lookup service configuration, associate SiteB NSX manager to SiteB vCenter. Check the status from SiteA vCenter Webclient -> Networking & Security -> Installation -> Management.
Step 3: Import the Distributed switch to Cluster B, add the hosts & assign the interfaces.
Login to https://psc-01a.corp.local:5480/ to check the NTP server details and note it down. Use the VAMI credentials given to login. Need to click on Edit to see the server details in here as it is not showing up in the main page (In exam, it is showing in the main page itself).
Important NOTE:
In exam change Lookup Service Port according to NSX Manager of Site A which is working one.
It's 7444 in exam.
Click refresh if in case it shows as disconnected.
Login to SiteA vCenter using Web Client and confirm the status of both the NSX Managers: Installation -> Management.