
考試名稱: SAP Certified - Implementation Consultant - SAP S/4HANA Cloud Public Edition (C_S4CPB_2602)
認證提供商: SAP
相應認證: SAP Certified Associate

超過 63291+ 位滿意的客戶
最新的高品質 C-S4CPB-2602 考試練習題庫

即时下載:我們的系統會在付款後的一分鐘內自动將您購買的產品發送給您。(如果在12小時內沒有收到,請聯繫我們。注意:不要忘記檢查你的垃圾郵件。)
100%退款保證
Fast2test在我們的客戶中擁有前所未有的99.6%的首次通過率。 我們對我們的產品非常有信心,所以我們不提供会给客户带去麻煩的產品。
- 高品质的認證考試培訓材料
- 有三個版本可供選擇
- 10年的行業經驗
- 365天免費更新
- 隨時隨地練習
- 100%安全的購物體驗

- 可执行的應用程序
- 模擬真實的考試環境
- 增加考試信心,增强记忆力
- 支持所有Windows操作系統
- 兩種练习模式随意使用
- 隨時離線練習

- 網上模擬真實考試,方便,易用
- 無需安裝,即時使用
- 支持所有的Web瀏覽器
- 支持離線緩存
- 有測試歷史記錄和技能評估
- 支持Windows / Mac / Android / iOS等

- 可打印的PDF格式
- 简单清晰方便阅读
- 可以任意拷贝到不同设备
- 隨時隨地學習
- 支持所有的PDF阅读器
- 購買前可下載免費試用
語言易於理解
作為一個行業新人,專業書籍中那些難以理解的單詞和表達常常讓你感到懊惱,但C-S4CPB-2602練習材料將幫助你完美地解決這個問題。由學習材料聘請的行業專家,將通過示例,圖表等解釋所有難以理解的專業詞彙。 C-S4CPB-2602實際測試中使用的所有語言都非常簡單易懂。使用我們的學習資料,您不必擔心您無法理解解專業書籍的內容。你也不需要花費昂貴的學費去輔導班。 C-S4CPB-2602測試引擎可以幫助您解決學習中的所有問題。
最省時最高效的學習方法
我們的C-S4CPB-2602練習材料有三種不同版本:PDF,軟件版本和APP在線版本。它們為不同的考生提供了選擇其研究方法的可能性。如果您是辦公室工作人員,您可以在地鐵或公交車上學習C-S4CPB-2602真實考試的在線版本;如果你是一名學生,你可以在排隊吃飯時復習;如果你是家庭主婦,你可以在孩子睡覺時學習。同時,我們的學習資料支持離線學習,避免了沒有網絡就無法學習的情況。同時,使用C-S4CPB-2602測試引擎進行審核,讓您從標題中就能查看知識點,不僅可以讓您更深刻地記住知識點,還可以讓您避免閱讀書籍的枯燥過程。
C-S4CPB-2602練習材料不僅適用於學生,也適用於上班族;不僅適用於工作的退伍軍人,也適用於新招募的新人。我們的學習材料使用非常簡單易懂的語言,以確保所有人都能學習和理解。 C-S4CPB-2602真正的考試也可以讓你避免課本閱讀的枯燥,但讓你掌握練習過程中的所有重要知識。選擇C-S4CPB-2602測試引擎的原因如下。
保證100%通過
我們相信所有購買C-S4CPB-2602練習材料的學生只要能夠按照我們的學習材料提供的內容,每天進行學習,並通過模擬考試定期自我檢驗,就能順利通過專業資格考試。一旦您不幸使用我們的C-S4CPB-2602真實考試題庫未通過考試,我們將全額退款。退款流程非常簡單。只要您向員工提供您的成績單,您很快就會收到退款。當然,在您購買之前,我們的學習資料將為您提供免費試用服務,只要您登錄我們的網站,您就可以免費下載我們的試用版。我相信在您嘗試C-S4CPB-2602測試引擎後,您會愛上它們。
SAP C-S4CPB-2602 考試大綱主題:
| 章節 | 目標 |
|---|---|
| Fiori 啟動平台與資訊安全 | - 身分識別與存取管理 - Fiori 應用程式與角色配置 |
| 資料移轉與系統整合 | - 整合情境與工具 - 移轉控制台與資料載入作業 |
| 測試與正式上線準備作業 | - 營運流程測試 - 正式上線驗證作業 |
| 雲端實施基礎概念 | - 認識 SAP S/4HANA Cloud Public Edition - 雲端思維與 SAP Activate 方法論 |
| 專案準備與標準流程適配工作坊 | - 蒐集營運需求 - 建置實施團隊 |
| 系統配置與範圍界定 | - 系統架構與權限設定 - SAP Central Business Configuration (CBC) |
最新的 SAP Certified Associate C-S4CPB-2602 免費考試真題:
SIMULATION
Migrate Bank Data
Business Scenario
You are responsible for migrating bank data into the SAP S/4HANA Cloud Public Edition system. You have determined the best method is Migrate Data Using Staging Tables, as you only have a couple banks to migrate.
Prerequisites:
Note:
In the task below, always replace ###### with the last 6 digits of your group number.
Note:
Make sure to use the EXACT names/values/spaces as they are listed in the task. Even forgetting a space or a number will cause the validation of the task to fail and be marked as incorrect.
Task:
Migrate the bank data listed below.
Table 1: Bank 1

答案:
See Explanation below for all solution
Explanation:
Objective
The purpose of this task is to migrate two bank master records into SAP S/4HANA Cloud Public Edition using the Migrate Data Using Staging Tables approach.
This task is performed inside the migration project created earlier:
Migration Project Name: Bank Data ######
Migration Object: Bank
The bank master data must be entered exactly as provided in the task tables.
Business Scenario Explanation
In this scenario, you are responsible for loading a small number of bank records into the system. Because there are only two banks to migrate, the selected migration method is:
Migrate Data Using Staging Tables
This method requires you to:
open the existing migration project,
download the Bank templates,
populate the required CSV file with the bank data,
upload the files,
validate the data,
transfer the data to staging tables,
complete any required mapping tasks,
migrate the bank instances,
verify the migrated banks in the target app.
Important Notes
Always replace ###### with the last 6 digits of your group number.
Use the values exactly as shown in the task.
Keep names, spaces, and numbers exactly correct.
During your execution, mappings may be required for:
Country/Region Key
Language Key (ISO)
Regional Code
Bank Key
If regional text values like Pennsylvania or Georgia are rejected, mapping may be needed to:
PA
GA
Example
If the suffix is 000013, the values become:
Bank 1
Bank Country/Region = US
Bank Key = A000013
Bank Name = Bank of A000013
Street = West Chester Pike
House Number = 3999
City = Newtown Square
Postal Code = 19073
Country/Region = US
Language = EN
Location = Pennsylvania
Bank 2
Bank Country/Region = US
Bank Key = Z000013
Bank Name = Bank of Z000013
Street = Lenox Road
House Number = 3580
City = Atlanta
Postal Code = 30326
Country/Region = US
Language = EN
Location = Georgia
Detailed Step-by-Step Procedure
Step 1: Open the app "Migrate Your Data"
From the SAP S/4HANA Cloud launchpad:
Log in to SAP S/4HANA Cloud.
Search for:
Migrate Your Data
or
Migration Projects
Open the app.
Explanation:
This app is the migration cockpit where the project and Bank migration object are maintained.
Step 2: Open the migration project
In the migration projects list:
Search for your project:
Bank Data ######
Open the project.
Example
If your suffix is 000013, open:
Bank Data 000013
Explanation:
This is the migration project created in the previous task and it contains the migration object Bank.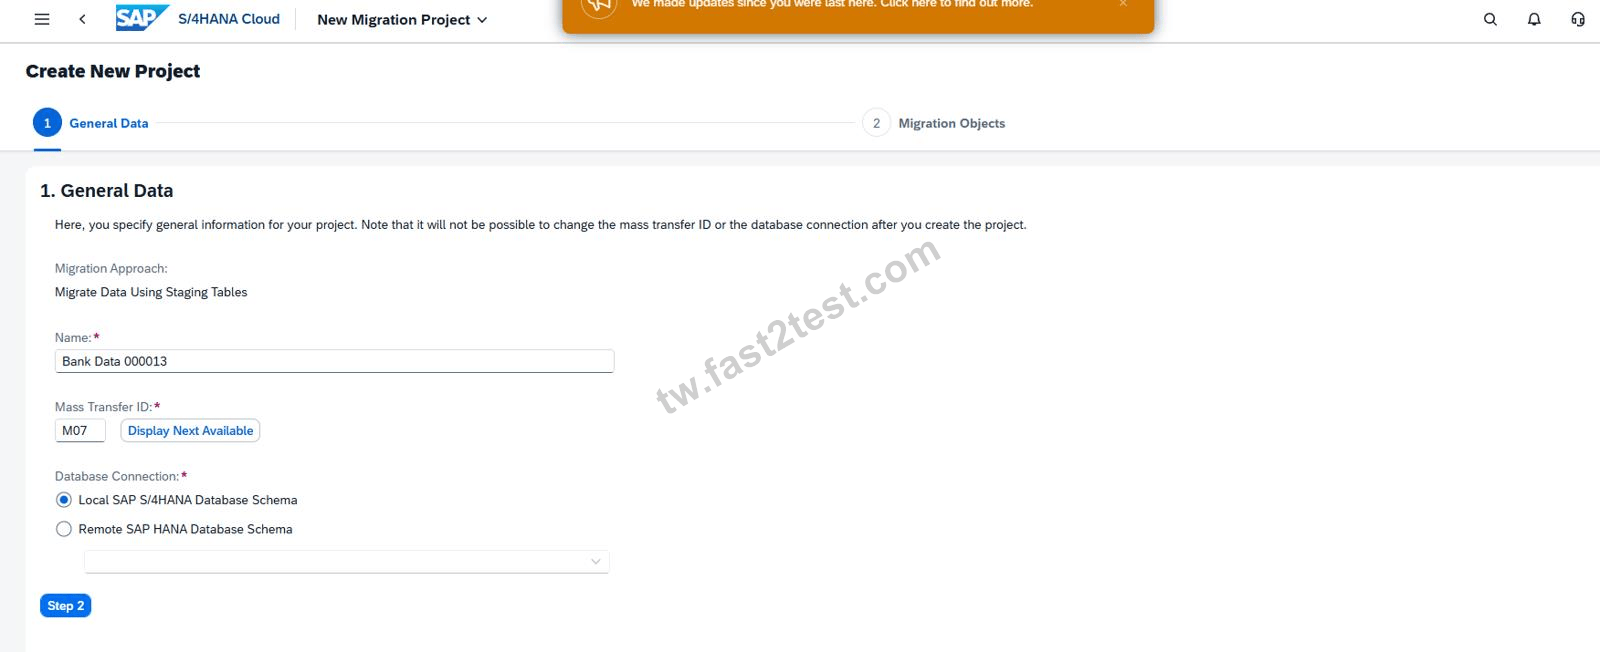
Step 3: Open the Bank migration object
Inside the migration project:
Locate the migration object:
Bank
Open it.
Explanation:
The Bank migration object is where the templates, uploads, mapping tasks, and migration instances are handled.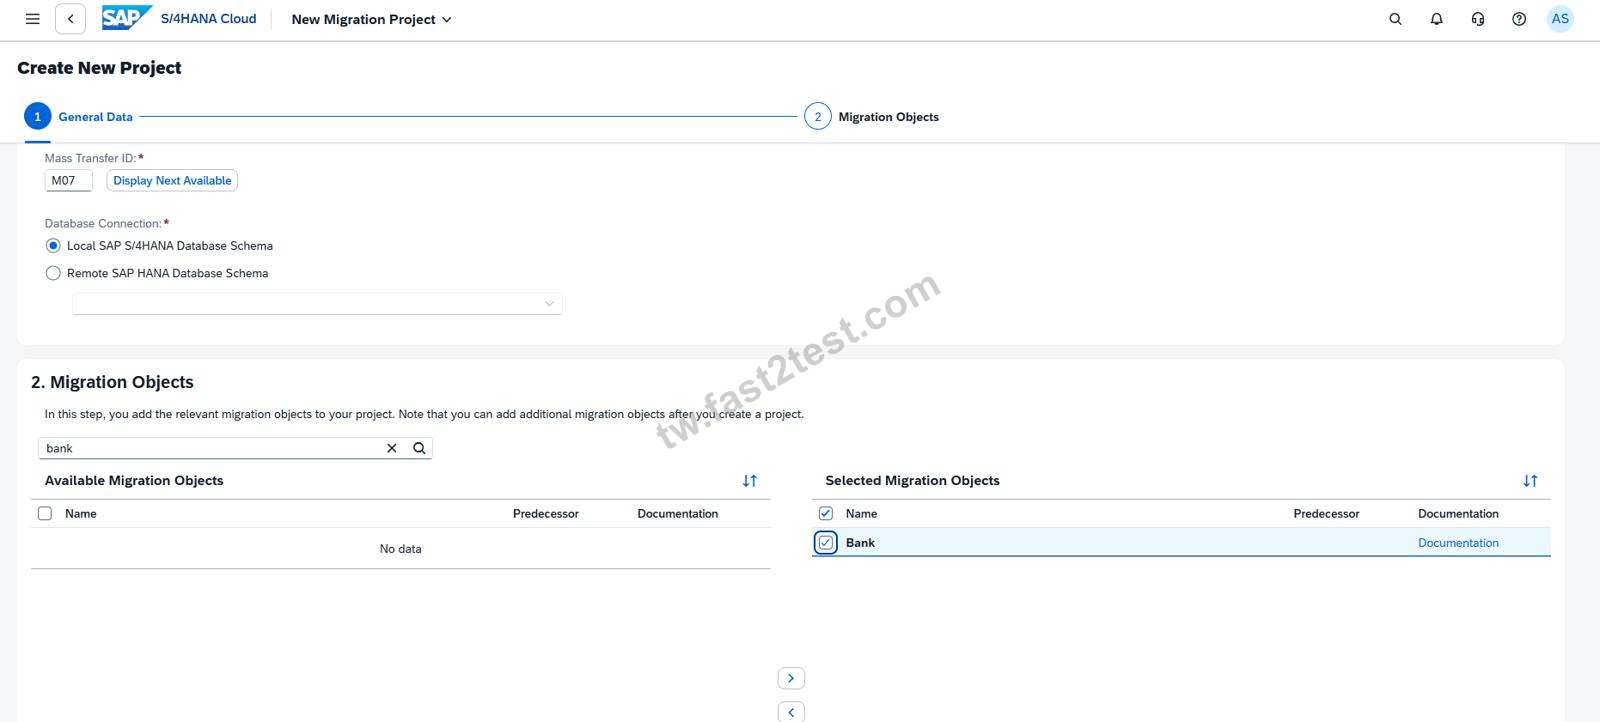
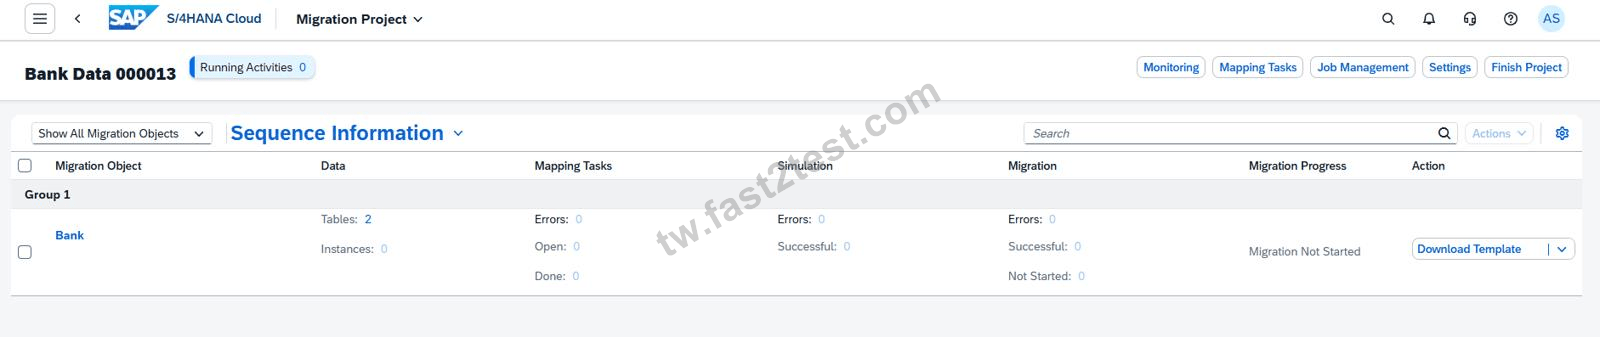
Step 4: Download the template files
On the Bank migration object screen:
Click:
Download Template
This provides the CSV template files needed for migration.
Explanation:
For the Bank migration object, the main files typically include:
S_BNKA#FreeText_Mandatory.csv
S_SCRIPT_ADRC#FreeText.csv
The mandatory file contains the bank master structure; the second file is optional for international address versions.
Step 5: Populate the mandatory Bank CSV file
Open the mandatory CSV file:
S_BNKA#FreeText_Mandatory.csv
Enter the two bank records exactly as required from the task tables.
Explanation:
This file must contain the bank master data that will be loaded into the staging tables.
The data must match the required values exactly.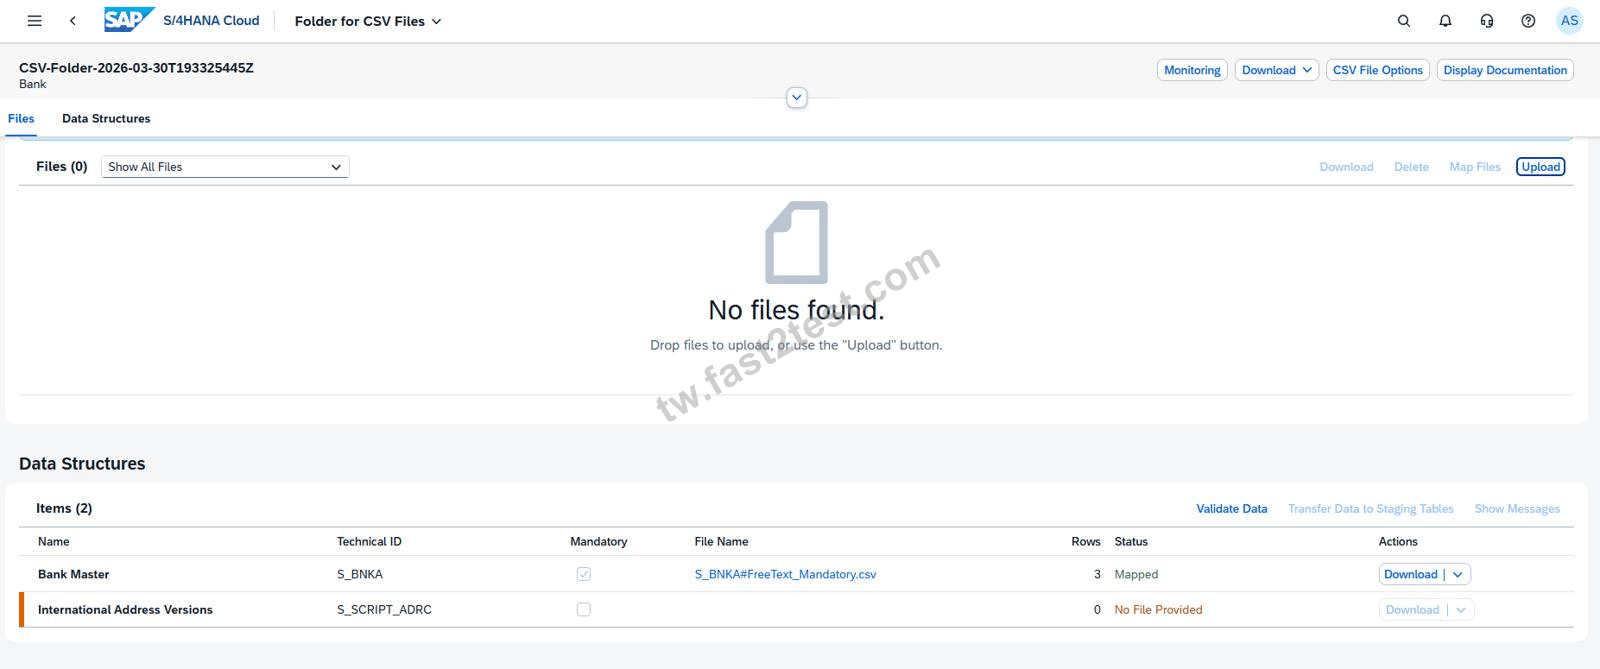
Step 6: Use the correct values in the Bank CSV
Populate the mandatory file with the two records.
Bank 1
Bank Country/Region = US
Bank Key = A######
Bank Name = Bank of A######
Street = West Chester Pike
House Number = 3999
City = Newtown Square
Postal Code = 19073
Country/Region = US
Language = EN
Location = Pennsylvania
Bank 2
Bank Country/Region = US
Bank Key = Z######
Bank Name = Bank of Z######
Street = Lenox Road
House Number = 3580
City = Atlanta
Postal Code = 30326
Country/Region = US
Language = EN
Location = Georgia
Explanation:
These values create two bank master records, one beginning with key A###### and the other with key Z######.
Step 7: Keep the optional international address file empty if not needed For the file:
S_SCRIPT_ADRC#FreeText.csv
leave it with header only if no separate international address version data is required.
Explanation:
During your execution, the optional file was not required and the Bank migration still proceeded because only the mandatory Bank Master structure had to be populated.
Step 8: Open Upload Files
In the Bank migration object:
Go to:
Upload Files
Explanation:
This is where the CSV folder is created and the files are uploaded to the migration cockpit.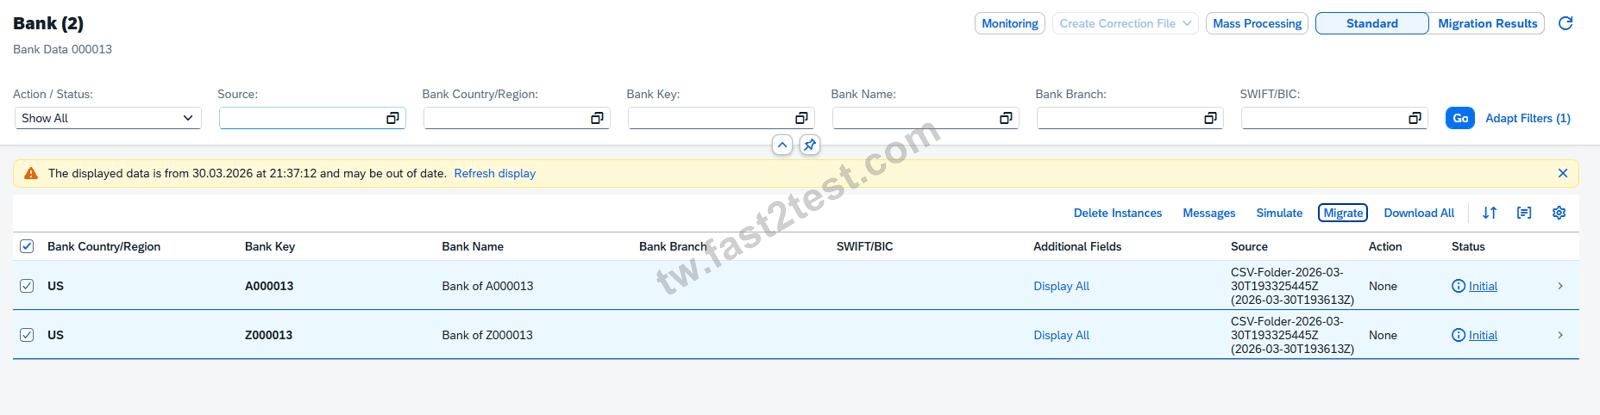
Step 9: Create a CSV Folder
Click:
Create CSV Folder
Explanation:
When using CSV with staging tables, SAP groups the upload into a CSV folder structure.
Step 10: Upload the CSV files
Upload:
S_BNKA#FreeText_Mandatory.csv
S_SCRIPT_ADRC#FreeText.csv (optional / empty if not used)
Explanation:
The mandatory file is required.
The optional file may remain empty or not provided depending on the migration object's structure.
Step 11: Validate the data
After upload:
Click:
Validate Data
Explanation:
This checks:
file readability,
required columns,
correct structure,
duplicate keys,
and data consistency.
Step 12: Correct any file or format errors if needed
During execution, common issues included:
wrong file mapping,
UTF-8 / CSV reading problems,
missing mandatory fields,
duplicate key values,
region value mismatches.
Explanation:
You must resolve validation errors before continuing to staging tables.
Examples from your run:
duplicate key values had to be corrected,
file structure mapping had to be adjusted,
CSV encoding had to be corrected.
Step 13: Transfer data to staging tables
After validation is successful, click:
Transfer Data to Staging Tables
Explanation:
This moves the validated CSV data into SAP's staging tables so the Bank migration object can create migration instances.
Step 14: Go to Mapping Tasks if required
If the system shows mapping tasks, open:
Mapping Tasks
Explanation:
For your run, the following mappings had to be confirmed:
Country/Region Key
Language Key (ISO)
Regional Code
Bank Key
Step 15: Maintain mapping values
If mappings appear, confirm or maintain them as follows:
Country/Region Key
source US → target US
Language Key (ISO)
source EN → target EN
Regional Code
If text values are shown:
source Pennsylvania → target PA
source Georgia → target GA
Bank Key
Confirm the system-generated source values to the correct target values for:
A######
Z######
Explanation:
These mappings are required when the migration object needs target-system value confirmation before posting the records.
Step 16: Confirm the mapping tasks
After maintaining the mappings:
Click:
Confirm
Explanation:
All mapping task statuses should change to Confirmed before running migration again.
Step 17: Open the Bank instances
Return to the Bank migration object and open:
Instances
Explanation:
This screen shows the individual bank records created from the staging-table data.
Step 18: Select the bank instances
Select both bank records.
Expected rows:
US / A######
US / Z######
Explanation:
Both bank records must be selected so they can be migrated into the target system.
Step 19: Click Migrate
Click:
Migrate
Explanation:
This starts the actual creation of bank master records in the target SAP S/4HANA Cloud system.
Step 20: Resolve authorization issue if it appears
During your execution, migration initially failed with:
You are not authorized to create bank data for country/region US
The fix was to assign the additional business role:
Master Data Specialist - Bank Data
SAP_BR_MD_SPECIALIST_BNK
Explanation:
The migration cockpit role alone is not always enough.
Bank creation also requires bank master data authorization.
Step 21: Refresh and check migration status
After migration:
Refresh the screen.
Check the status of both bank instances.
Expected final result:
Success
Success
Explanation:
Both bank rows must finish successfully for the task to be considered complete.
Step 22: Verify in "Manage Banks - Master Data"
Open:
Manage Banks - Master Data
Search for:
US / A######
US / Z######
Explanation:
This is the final business verification step that proves the bank master records were created successfully in the system.
Expected Result
After this task is completed successfully:
both bank records are loaded through staging tables,
all mapping tasks are confirmed,
both migration instances complete successfully,
the two banks are visible in Manage Banks - Master Data.
SIMULATION
Create a Business User and Assign a Business Role
Business Scenario
You are working on an implementation project and need to create a test user in the system for demonstrating the professional services business processes to project managers during your upcoming Fit-to-Standard workshop. Follow the instructions below to create a new test user with a basic import of worker and work agreement data.
Note: In the task below, always replace ###### with the last 6 digits of your group number.
Note:
Make sure to use the EXACT names/values/spaces as they are listed in the task.
Even forgetting a space or a number will cause the validation of the task to fail and be marked as incorrect.
Task:
Assign the HR Administrator (BR_ADMINISTRATOR_HRINFO) business role to your user.
答案:
See Explanation below for all solution
Explanation:
Task 3: Assign the HR Administrator Business Role to Your User
Objective
The purpose of this task is to assign the HR Administrator business role to your own business user so you can continue the worker, work agreement, and business user setup activities required for the professional services scenario.
The required business role is:
Business Role ID: BR_ADMINISTRATOR_HRINFO
Business Role Description: Administrator - HR Info
Task 3: Assign the HR Administrator Business Role to Your User
Objective
The purpose of this task is to assign the HR Administrator business role to your own business user so you can continue the worker, work agreement, and business user setup activities required for the professional services scenario.
The required business role is:
Business Role ID: BR_ADMINISTRATOR_HRINFO
Business Role Description: Administrator - HR Info
Step 1: Open the app "Maintain Business Users"
From the SAP S/4HANA Cloud launchpad:
Log in to SAP S/4HANA Cloud.
Use the app search or launchpad search.
Search for:
Maintain Business Users
Open the app.
Explanation:
This app is used to maintain user master data and assign business roles.
All business role assignments for your own user are done here.
Step 2: Search for your own user
In Maintain Business Users:
In the filter/search area, enter your own user name or user ID.
Click Go.
Explanation:
You need to open your own user because the HR Administrator role must be assigned to your own account before continuing the simulation.
Step 3: Open your user record
After the search results appear:
Click your own user in the result list.
Open the detail page.
Explanation:
This opens the business user detail screen where all assigned roles can be reviewed and maintained.
Step 4: Switch to Edit mode
On the user detail page:
Click Edit.
Explanation:
Edit mode is required before you can add or remove business roles.
Without edit mode, the Assigned Business Roles tab is display-only.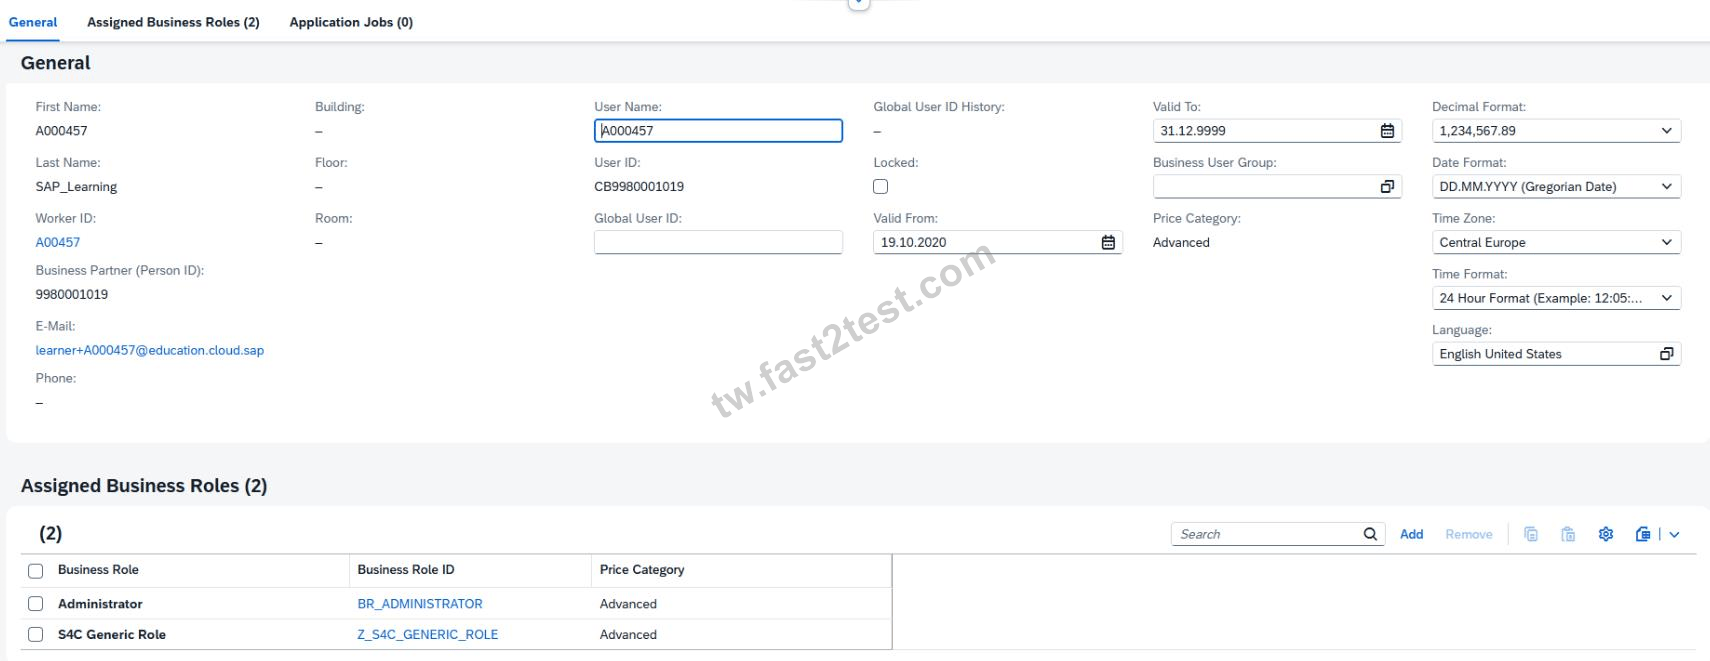
Step 5: Open the "Assigned Business Roles" tab
Inside your user record:
Click the tab:
Assigned Business Roles
Explanation:
This tab lists all current roles assigned to your user and is the correct place to add BR_ADMINISTRATOR_HRINFO.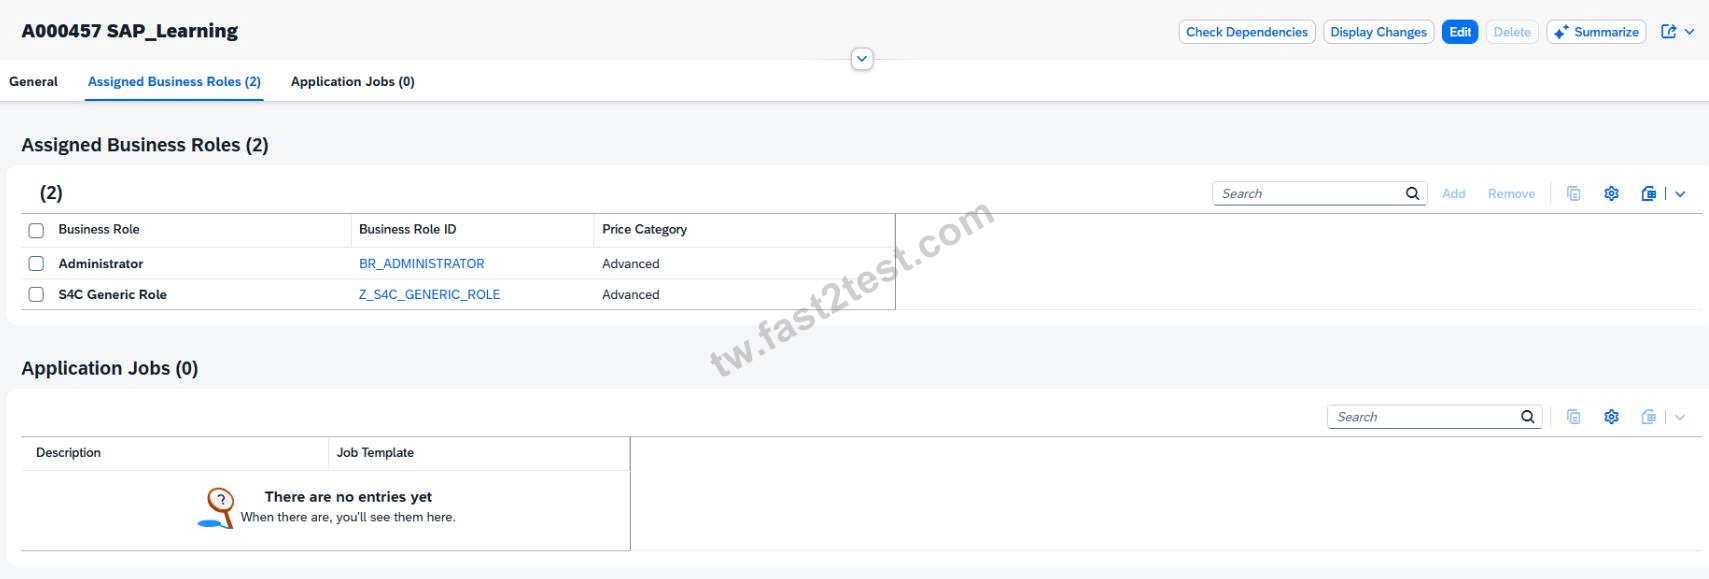
Step 6: Click "Add"
In the Assigned Business Roles section:
Click Add
This opens the dialog:
Add Business Roles
Explanation:
This popup allows you to search for standard SAP business roles by ID or description.
Step 7: Search for the HR Administrator role
In the Add Business Roles popup:
In Business Role ID, enter:
BR_ADMINISTRATOR_HRINFO
Click Go
Select the role:
Administrator - HR Info
Business Role ID: BR_ADMINISTRATOR_HRINFO
Explanation:
This is the exact role required by the task.
It gives you the workforce / HR information administration permissions needed for the later simulation steps.
Step 8: Add the role to the user
After selecting the role:
Click OK or Apply
The role should now appear in your assigned roles list.
Explanation:
At this stage, the role is added to the user in draft mode, but it is not yet permanently stored until you save.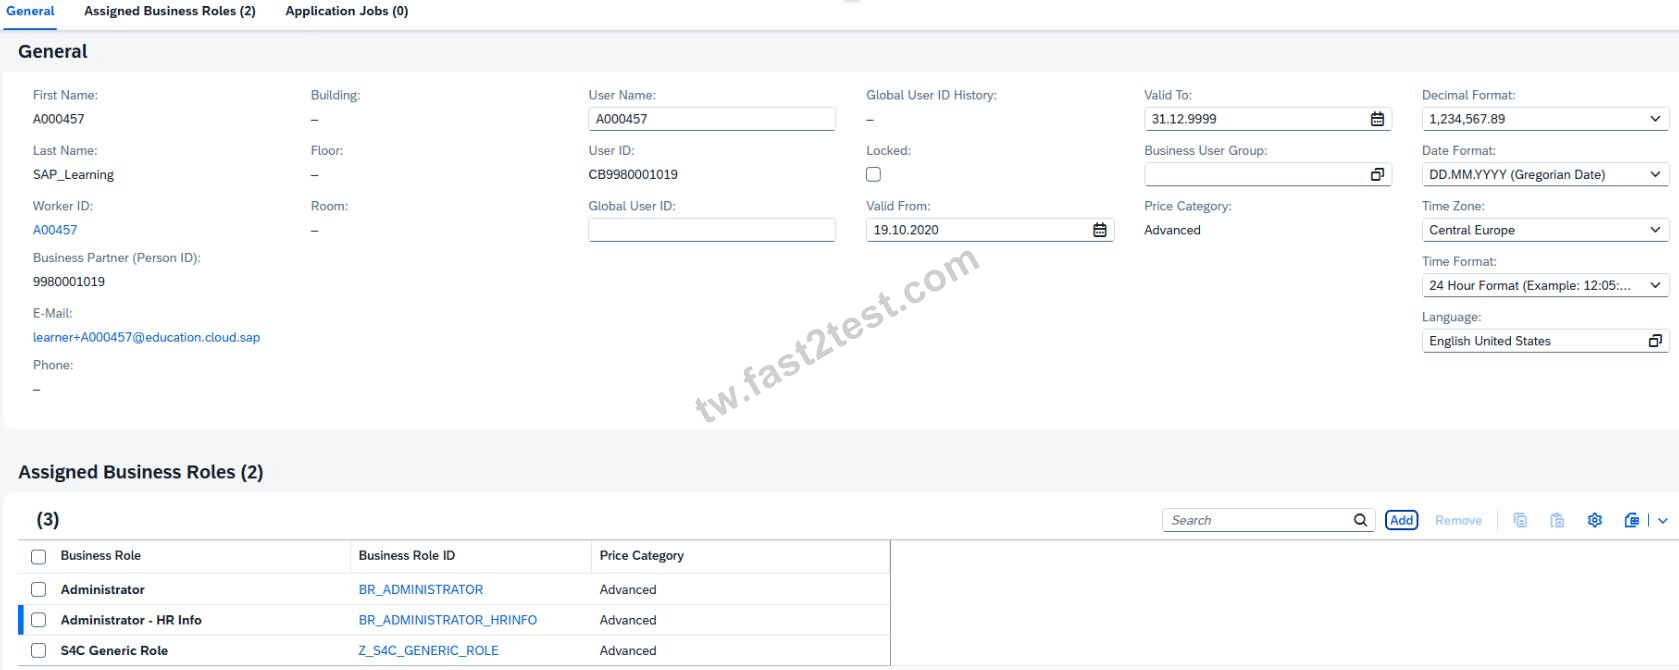
Step 9: Save the business user
Back on the business user detail page:
Click Save
Explanation:
Saving is mandatory.
If you do not save, the role assignment remains incomplete and later tasks may fail because your user will not actually have the HR Administrator authorization.
Step 10: Verify the role assignment
After saving, verify that the role appears in the assigned roles list:
BR_ADMINISTRATOR_HRINFO
Administrator - HR Info
Explanation:
This is your proof that the task is complete.
You should see the HR role together with your other assigned roles.
Expected Result
After completing this task successfully:
your user has the HR Administrator role assigned,
the role appears in Assigned Business Roles,
the user is saved successfully,
later worker/business-user creation steps can be performed.
Why this role matters
The role BR_ADMINISTRATOR_HRINFO is required because the scenario involves:
worker information,
work agreement information,
user creation for workshop demonstration,
HR-related administration steps.
In SAP S/4HANA Cloud, access is always role-based, so assigning this role is an authorization prerequisite for later tasks.
 1456條客戶評論客戶反饋 (*一些類似或舊的評論已被隱藏。)
我只有一天的時間做考試準備,讓人興奮的是,我通過了C-S4CPB-2602,此刻我的心情無法形容,謝謝!

49.65.236.*

不錯的考古題,我僅花了23個小時學習和記住答案,就成功的通過了C-S4CPB-2602測試,我接下來準備C_S4TM_2601考試,請給我一些可用折扣優惠倦,謝謝!

114.26.154.*

不敢相信,我通過了我的 C-S4CPB-2602 考試,感謝你們提供的題庫是有效的。

125.7.115.*
因為朋友推薦了你們網站,所以我購買了你們的C-S4CPB-2602考試題庫,里面的試題非常不錯,我通過了考試。

223.136.82.*
我將可以擁有一份很好的工作了,感謝 Fast2test 網站的幫助,讓我成功通過了 C-S4CPB-2602 考試,并拿到了認證書。

101.231.141.*
通過了今天的C-S4CPB-2602考試并取得了不錯的成績,这題庫仍然是有效的,對于像我這樣沒有太多時間準備考試的人,Fast2test是很不錯的選擇。

36.231.21.*
已通過我的 C-S4CPB-2602 考試,即使在很短的時間內,我也能很容易的做好考試準備,并一次通過它,這多虧了有你們提供的考試題庫。

218.173.105.*
今天通過了我的C-S4CPB-2602考試,我使用了你們的題庫在我的考試中,這題庫非常好,對我的幫助很大。

41.108.197.*
一開始我不太相信網上的廣告,直到SAP C-S4CPB-2602考試通過,才證明我的選擇那么完美,并且還獲得了一個不錯分數。感謝Fast2test網站。

183.63.14.*
很傷心,我花了很多錢,但測試失敗了兩次,不過幸運的是你們的C-S4CPB-2602題庫幫助我通過了考試。

59.126.203.*
這個學習資料可以說是在我通過SAP C-S4CPB-2602考試必不可少的資料,我購買了它,并在考試中取得了不錯的成績。

108.181.134.*
很不錯的題庫為考試做準備,讓我在很短的時間內通過了C-S4CPB-2602考試,謝謝Fast2test網站對我的幫助!

60.248.184.*
幾個月之前,我決定要通過C-S4CPB-2602和C_S4TM_2601考試。但是我不想花錢參加培訓課程,所以我購買了你們Fast2test網站的最新考古題,為我的認證考試做準備。上周,我已經通過了這兩門考試,我真的很開心,感謝你們提供的學習資料。

140.117.221.*
不敢相信,我通過了我的 C-S4CPB-2602 考試,感謝你們提供的題庫是有效的。

118.140.150.*
我成功的通過了我的所有認證考試,非常感謝你們!

27.247.0.*
我參加了C-S4CPB-2602考試,通過使用Fast2test網站的考試資料,我順利一次通過了考試,感謝你們的幫助。

106.147.218.*
今天我通過了考試,不得不說Fast2test網站的考試題庫是真的很有幫助。

175.96.84.*
很棒,可以順利通過C-S4CPB-2602考試!

114.34.126.*
通過了!這是很很棒的SAP C-S4CPB-2602學習培訓資料。

118.101.240.*
我將可以擁有一份很好的工作了,感謝 Fast2test 網站的幫助,讓我成功通過了 C-S4CPB-2602 考試,并拿到了認證書。

137.132.3.*
在昨天剛剛過的 C-S4CPB-2602 考試中,我取得了不錯的分數,并且拿到了認證。你們的考試題庫非常好,所有的問題都是有效的!

1.36.199.*
感謝Fast2test網站提供的考試題庫,讓我在C-S4CPB-2602考試中以高分通過了考試。

60.248.116.*
立即下載 C-S4CPB-2602
付款後,我們的系統會在付款後壹分鐘內將您購買的產品發送到郵箱。如2小時內未收到,請與我們聯系。
365天免費更新
購買後365天內可免費升級。365天之後,您將獲得50%的更新折扣。

退款保證
如果您在購買後60天內沒有通過相應的考試,可以全額退款。並且免費獲得任何其他產品。
安全與隱私
我們尊重客戶的隱私。 我們使用McAfee的安全服務為您的個人信息提供最高安全性,讓您高枕無憂。
